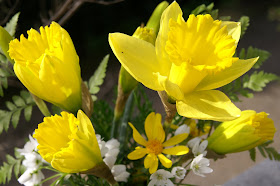
A bit of brightness is always welcome after a long winter, so I thought of course of daffodils. I planted a row of bulbs last year and have been enjoying them dancing in the garden...
Which made me pull out my cheerful DAFFODIL COLLAGE, one of the very first flower collages I stitched, lo, these many years past:
I'm always pleasantly surprised to re-view the stitch "swatches" I chose for my flowers and I am reminded again of how fun they were to think up and stitch. Here's one of my favorites, which is a basic box grid (stitched with a variegated thread) then you fill it with whatever fun motifs you want:
And as I was picking out patterns, I tried to use ones that looked like daffodils, with stiff outer petals with a concentrated center. Here's a favorite floral pattern that surprised me how much it looked like a patch of daffodils standing stiffly at attention:
For my other daffodil swatches, I also experimented with two blackwork patterns, and then added a bit more color within the open areas. Here's one of them, as well as the lower right block photo further down:
So, having shared my stitched DAFFODIL COLLAGE with you, I'll leave you with a real bouquet of daffodils....
HAPPY FRIDAY!
Friday, April 29, 2011
Friday, April 22, 2011
Friday Flowers: Easter Bouquet
Thursday, April 21, 2011
Everything's Just Ducky!
I've been having fun revisiting several of my favorite quilt designs and they have inspired several new designs that I'm currently working on. The latest design that I've finished and am releasing this month is one I call "DUCKS IN A POND". (If you look at the photo above, you might be able to see the four mama ducks with their four little ducklings paddling into the center of the pond.)
The colors of this quilt are very fresh and springy - apple green and sky blue. And I've decided to return to using some of the simple stitch patterns that I've used past patterns that easily replicate fabric swatches in a quilt. Here's a close-up of one of the central green quilt blocks, that shows the simplicity of the stitches:
And here's the opposite blue block with a slightly different stitch pattern in the blue "pieces":
There are also two soft metallic ribbon threads used in this piece; you can see them both in the center diamond as well as the bright corner bits.
And just to mix things up a bit and add something unexpected to the design, I created a fun zig zag border that switches background colors in each quadrant. Here it is up-close where the colors meet in the center:
The springy colors of this design make me smile every time I look at it. But you know, it would sure be fun to see it in other colors as well - any two colors that tickle your fancy would be fun to try, don't you think?
Anyway, if you're in the mood to celebrate spring (or even stitch something for Mother's Day) and you would like more information about ordering my new DUCKS IN A POND, please visit my website listed at the right.
Friday, April 15, 2011
Tip Toe Time....
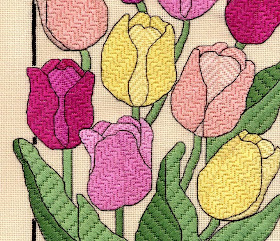
Are you ready for even more Spring? I am. And I thought you might like a bouquet of spring tulips to brighten your day (this is TULIPS from my Secret Garden Collection, stitched on finer 24 ct. Congress Cloth):
Nothing like a little bit of warm sunshine, pastel-colored flowers, and the tender buds of fresh green leaves to lift your spirits. (ASIDE: the pattern also has a colorway for brighter tulips, too.)
Here....take a sniff up-close...and while you're looking, see how I used the stitch's directional change to mimic the light changes on the tulip petals:
And since it's Friday, I'll close with some Friday Flower shots of the individual tulips that are currently appearing in my backyard:
Ahhhhh....Spring is definitely here to stay -- so enjoy your day!
Wednesday, April 13, 2011
Stitching Miss Daisy
To celebrate the arrival of Spring, I thought I'd share some past spring projects of mine. The first that comes to mind is DAISY O'HARE. I was inspired to create a complex bunny figure that had LOTS of different stuff to stitch, in many different types of threads. (And sometimes, I just have to find a reason to stitch on pink canvas!)
Here's a look at her sweet face:
Her dress was fun to stitch, with lots of different threads and stitches to play with:
And the borders are filled with lots of springy stuff -- flowers of course, plus a gingham ribbon border, where you get a glimpse of the variegated silk thread in the bordering little checkers (I used Waterlilies 028, "Confetti"):
And the top and bottom borders have more Eastery stuff - more flowers, long tied bundles instead of gingham, plus little Easter eggs in each corner!
Someday I hope to stitch up a companion piece that has a boy bunny to keep Daisy company.... but until then I'll just keep stitching away at all my OTHER projects this spring...
Friday, April 8, 2011
An Old-Fashioned Garden
Speaking of quilt gardens, how about my GRANDMOTHER'S GARDEN?
I've always loved those faded old quilts that have the flower-shaped blocks, usually done with scraps of old clothing or floral fabrics. This was my attempt at re-creating those beautiful old quilts - but using stitches instead of fabric!
Here's what those rounded sections look like up-close, made up of lots and lots of scotch squares, and also you can see how the variegated flowers are alternated with rows of solid color flowers:
Again, I was going for an old-fashioned feel, and used a variegated thread that reminded me of spring florals. But when I look at it now, I wonder how different it would look if it were done in bolder colors(like reds, oranges and yellows), which would definitely give it a more contemporary and purely graphic feel.
Oh, the infinite stitching possibilities!
And since it's Friday, I'll sneak in a few matching flowers to end the week...
HAPPY FLOWER-FILLED FRIDAY!
Wednesday, April 6, 2011
Feeling Flowery
I was working in the garden most all weekend, so this week I thought I'd highlight some of my flower quilt designs that I've been reprinting and sending to shops around the country...
Here's my very first flower quilt, called FLOWER BASKET, which uses the very traditional flower basket motif. It's a simple design but very effective all the same (and it's one of only a very few of my patterns that has tent stitches in the pink background areas):
As I recall, I also stitched a small pillow from this design, working just one of the flower baskets with the scalloped border - in soft lavenders and yellows.
Here's the next flower-themed quilt I designed, called FLOWER GARDEN, because I thought the outer border looked like a picket fence with a row of flowers in front:
And then there's the ever-popular FLOWER SAMPLER, in which I decided to create an assortment of my favorite flower quilt blocks and just put them together! I used a very pastel variegated thread on this model, and as I look at it now, I think it would look so very different done in darker or bolder color combinations. It's a good pattern for experimenting with different color combos, as well as very fun to stitch, with each block being different:
This is another design that would be easy to stitch up in a smaller version - say, four of your favorite flower blocks....
Sooooo, if you haven't got spring flowers in your yard yet, maybe you'd enjoy stitch up a garden of flowers instead!
Monday, April 4, 2011
My Egg-cellent Idea
You know the BARGELLO EGG I showed you a while ago? Well, today I thought I'd share with you how that design came about. I don't know if you're like me, but I'm always fascinated with HOW designs come into being. The creation of a new project always seems like such a delightful mystery, even when the step-by-step path of illumination seems obvious at times.
Anyway, a few years ago I decided to design my first bargello piece, which I called BARGELLO & ROSES:
I envisioned this design being made into a long, rectangular pillow that would show off the bullion-knot roses that run along the center of the piece. See?
I also thought that only a PART of the design could be stitched (there are notations on the pattern's main graph to that effect, if you want to try it yourself), and then inserted in a long pillow with two panels of tapestry fabric placed on either side. My Mom agreed to stitch up the bargello part of the model (while I did the bullion roses), and I thought it would be fun to see it done in yellows, like this:
(Have I sewn any of these projects into pillows yet? No. Maybe someday...)But I did hang the yellow BARGELLO & ROSES in my office and stare at it off and on for months.
Then one day, when I way looking at it from across the room, it struck me that it looked sorta like an Easter egg. Wow. Inspiration Struck. How fun would it be to make a bargello Easter egg and fill the center openings with favorite Easter treats like a bunny and flowers?
Well, I couldn't rest until I had the perfect egg shape (which, by the way, is devilishly hard to draw symmetrically by hand, but much easier to do using a computer!) and then I started filling it in with a softly rounded bargello pattern. And TA DA -- my springy BARGELLO EGG was born!