Wednesday, May 18, 2011
FYI: Just to Clarify
A blog reader recently asked me an interesting question about my new shadow stitching cyber class, PETUNIAS, and I thought I'd share it with you as well...
Marcy asked if my shadow stitching involves blending 2 or more thread colors in one needle, and then changing thread colors at every color change on the canvas.
My answer is: No, no, no! (That sounds like a fascinating technique, however, but way too much work for these little canvases...)
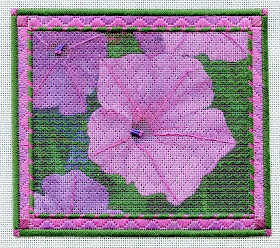
For my PETUNIAS I use 1 ply of a stranded silk and work one color over the whole flower (in this case, the center petunia). I use a slightly different color on the corner petunias (which you can see are a bit darker). The background is also worked with 1 ply of one green color. Whatever happens after that...just happens.
To me, the fun of using shadow stitching technique on these flower images is to see what happens as the thread color blends with the canvas colors underneath. Similar colors merge together; different colors start to compete with each other and create unexpected color "vibrations". For example: on the center petunia above, look at the glowing bright pink center of the upper petal near the bullions... That brightness comes from the canvas underneath, and shows through the pink thread on top.
Granted, using just one color over a detailed canvas mutes a lot of the crisp details and blurs the image overall. But it also takes on a watercolor wash over the whole piece, which is an effect I really like. Then, it's up to the stitcher to embellish whichever details you want to highlight - like the bullions in the petunia centers and the vein lines in the petals. Overall I think it looks kind of magical, don't you? (I should also mention that my challenge as a designer is to find the right images that will support this simple shadow technique. So currently, I'm looking thru my flower photos and selecting images that have lots of large areas that will work best for my one color technique.)
So...in a nutshell Marcy -- I have to say that my shadow stitching is pretty darn simple - one color per area, basically. Because, frankly, I like my stitching projects to be as fun as possible. When I started experimenting with these small flower images, I wanted to try something different, but I also wanted it to be a fast project as well. I consider these shadow stitching canvases to be fun "breather" projects that can be done quickly in-between other complex, long-term projects (and we all have plenty of those waiting to be done, don't we?).
Anyway, I hope this bit of clarification gives you more information about my PETUNIAS, and I hope it tempts you to give it a try!
Monday, May 16, 2011
Another Cyber Class
I never promised you a rose garden...
but here's the other cyber class I promised you this month and I'm calling it my GARDEN GATE:
I just LOVE stitching gardens, and this one is an especially sweet little 6" x 8" project worked on 24 ct. green Congress Cloth. I really enjoyed working with a handful of subtly variegated flosses from ThreadworX that helped create a more realistic garden. If you look closely, you'll see that the lawn, bushes, and flowers are all done with those variegated threads.
In order to make the climbing roses a bit larger in scale than the rest of the french knot flowers, I chose to use Ribbon Floss for the french and bullion knots, and they really look like big fat roses! Also, the opalescent Ribbon Floss also give the roses a soft sparkle of dewdrops - a very magical and pleasing effect.
Here's a peek at the piece up-close:
And after I finished stitching all my pink roses, I realized the piece would also look terrific with pale yellow roses too -- so stitchers can choose which color they prefer to go along with their delphiniums: pink or yellow. And, I've also included a "WELCOME" script that can be added to the bottom of the design, since I thought this would make a lovely welcome sampler in any home.
I consider GARDEN GATE to be a more intermediate-level project. The stitcher needs to be comfortable working embellishment stitches (french knots, bullions, lazy daisy stitches) on top of stitched areas, as well as having the confidence to add lots of those stitches in random patterns.
Random stitching often creates anxiety in stitchers... but this is one project that DOESN'T need all the surface stitches to be precise and perfectly aligned - au contraire, mon amie! In this case, the sloppier and more irregular the better. I know it can be scary to start (there's always that fear of making terrible mistakes) but once you get started working all those knots, you start to loosen up and actually have fun with it.... (you know, it can be very freeing plopping all those bullions and french knots hither and yon, without worrying about how neat they all are!)
So, if this GARDEN GATE cyber class (which starts at the end of July) gets your garden green thumb itching to start stitching, please visit my website for more information and the class registration form.
Saturday, May 14, 2011
New Cyber Class
I have been busy planning some new cyber classes and finally have them ready to offer to interested stitchers. The first one I'm going to share with you today is my PETUNIAS: Shadow Stitching class.
It all began with my own curiosity about shadow stitching. What is it? How do you do it? I for one, wanted to give it a try, but didn't want to practice on a large painted canvas... so I decided to try printing up some small canvases myself, using photos I've taken of flowers in my garden. Here are a few of the canvases I've already stitched using these fun techinques:
Stitching these small canvases is soooo fun, but it just isn't possible to mass produce them for stores. Then I realized that they would be a perfect cyber class that I could offer to a select group of interested stitchers.... Stitchers, who just like me, are curious about trying out shadow stitching techniques, but don't want to experiment on larger or more expensive painted canvases.
Sooooo, PETUNIAS is the first one I'm offering up as a cyber class. It has a finished size of 6" by 6.5" and it's done on 18 ct. mono canvas with a handful of Splendor silk threads, a #5 pearl cotton for the padded borders, and a metallic ribbon that adds a bit of glitz and glamour! (By the way, I've chosen Splendor silks because DMC floss is too thin for me and I found the silk thread to have slighly better coverage. And since you use very little thread in shadow stitching, the kits will have partial skeins of silks to keep the kit costs as low as possible.)
Here are my shadow-stitched PETUNIAS for you to see up-close:
I've chosen these PETUNIAS for the first project, because there are only a few stitches to deal with in large areas, so you can get a feel for shadow stitching without worrying about too many stitch or color changes. It's a good beginning project to see if you enjoy this type of stitching or not.
And, ahem... you know how much I like to add borders to everything, so this canvas (which just has the petunia image printed on it) is embellished with a few easy borders around it. I plan to add different borders to each of these canvases and I'm busy stitching new ones even as I write this....
Anyway, the PETUNIAS cyber class (which will start in July) includes the border techniques as well, so you'll be able to finish your canvas with a few neat borders techniques.
If you're interested in signing up for this cyber class, please visit my website for complete details and order form.
P.S.: I'll be posting another cyber class announcement in a few days, so come back and visit again soon!
Friday, May 13, 2011
A New Collage
It's been a while since I released a new flower collage, so I pulled out a half-done project and did a bit of marathon stitching to get it completed. And here it is, my brand-new PEONY COLLAGE:
I think it's save to say I'm entering my annual pink and green phase, so stitching all these luscious patterns was very satisfying using Watercolours 248, "Primrose" and watching the pinks play out:
And after stitching all that pinkness, I thought maybe I should soften it down a bit by injecting another color, so in came the apricot ribbon and dashes of apricot sprinkled around the design as well:
So if you're a lover of all things pink and green, and in the mood for a bit of spring stitching, check out my PEONY COLLAGE on my website for more information. Also, if you happen to be in Southern California in the next few weeks, you can see my actual PEONY COLLAGE model at a trunk show at Needlepoints, Ltd. in Garden Grove, California running through mid-June.