Thursday, January 14, 2010
Do You Love a Mystery?
A stitching mystery, that is....
Well, check out the American Needlepoint Guild website (www.needlepoint.org) and look at the brand new STITCH OF THE MONTH 2010 project called "A Promise of Mystery" designed by Sue Reed.
AREN'T YOU ALL READY TO START SOMETHING NEW AND FUN TO GET THE YEAR OFF TO A GOOD START? Well, January is the perfect month to begin a project that you build on month by month. And if you like counted canvaswork - especially geometrics - you'll certainly enjoy stitching on this piece too! This month is the start of the project, with the instructions on what materials are needed, where to start, and a schematic showing the overall dimensions of the piece (which has a finished size of apprx 8.5" x 8.5" on 18 ct. mono canvas.)
I can't resist a good counted geometric, so I'll be starting to work on it this month myself.... All I have to do is figure out what colors I'm in the mood to stitch with right now... pinks? blues? greens? hmmmm, that's the biggest mystery for me right now!
P.S.: The thread palettes shown in the above photos are NOT the threads used in Sue's mystery design - I just used them for illustrative purposes only.
Tuesday, January 12, 2010
Blackwork in Red = Rackwork?
Recently, I printed up a batch of my BLACKWORK PATTERNS book, and as I was collating and binding the pages, I always see something that catches my eye. This time it was a pattern that reminded me of pointsettia flowers. Here's the top of the page I saw:
The pattern on the left side shows what it would look like if you stitched the whole thing in just ONE color/thread type - all in black, for instance. The pattern in the middle shows how you would incorporate an ADDITIONAL color/thread to the pattern - like adding a metallic accent, for example. And the pattern on the right side shows how you might stitch it if you wanted to use SEVERAL colors and/or types of threads - such as different colors, metallic threads and even beads.
Still being in a festive holiday mood, I decided to stitch up a swatch of the pattern (using an ivory/cream piece of 24ct. Congress Cloth and a few strands of thread) and share the process with you.
Here are the main (or primary) design lines, done with 1 ply of 6-ply floss DMC 816:
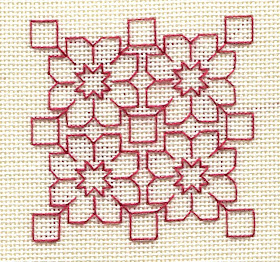
Next, I added the secondary stitches - this time using a fine red Kreinik blending filament (which adds a subtle red glisten to the design, although the photos don't show it).
Now to punch it up a little bit, I added the third layer of stitches, this time using a gold metallic thread. Notice how adding the gold metallic "warms" the overall feel of the piece, as well as adding some bling to the thing:
But wait, I'm not done yet!... there's still a few beads to add, to give it extra dimension and sparkle:
At this point, can you see how nice this would look if you turned it "on point" and whipped it up as a small ornament, with a small tassel hanging off the bottom? (The overall design size on 24 ct. is 2.25" x 2.25") And it was really quick to stitch up -- I did it in a few hours, in between printing, doing laundry, walking the dog, etc. And I also stitched the same exact pattern using a thicker thread and variegated as well (similar to a #8 pearl cotton or Wildflowers, for instance.) It looks a bit "chunkier" doesn't it? You can also stitch blackwork designs on 18 ct canvas and #5 pearl cottons, which makes the pattern much larger and bolder, of course.
And here's my parting slanted shot, where I was trying to get some of the metallic to shimmer a bit, to show you how very elegant blackwork can be, even when the stitches themselves are the most basic, simplest and plainest of straight stitches.
But that's what stitchery is really all about, isn't it? Something so simple - just a needle and thread making stitches on fabric - can be utilized in endlessly fascinating ways....Which is why we're all addicted to it, right?
(P.S. Stitchers: If you want to try stitching up this little pattern yourself, I give you my permission! Just click on the photos shown above and then go to your FILE menu, hit PRINT PREVIEW to see how large it will print, then hit PRINT to print out the photo - which you should be able to use as a quickie chart, and stitch off of that. Have fun!)
Tuesday, January 5, 2010
Before You Can Start A New Project, You Must Finish the Old...
Do you wonder what to do with your pieces after you've finished stitching them? Do you dread going to the framers and picking out different colors and types of mat boards? Would you like to try finishing some of your own pieces?
Well, I've got a blog for you to visit and get some inspiration for easy finishing. I was just visiting there myself, and was charmed, refreshed and re-inspired to stitch AND do some simple framing!
To see what I'm talking about, click on the blog title: allthebeautifulthings listed on the right side of my blog.
Firstly, scroll down and look at all her lovely photos, especially the ones with framed cross stitch pieces. Several of the stitched designs have no matting, but are instead "floating" inside a large expanse of the fabric. Not only does framing something this way eliminate the need to double or triple mat a design, but it lets your eye travel directly to the stitched design.
(I like framing stitchery pieces in this manner. It's very clean and yet can be rather traditional-looking....but at the same time it can be very modern-looking as well. So, it's a very versatile way of framing stitchery -- also less expensive! And as her photos show, she's using standard size frames, which is also easier on the budget. )
And secondly, if you'd like to try framing a piece yourself, but aren't sure how to go about stabilizing the stitched piece of linen or canvas, you can check out her short tutorial on framing, on the same blog.
Scroll over to the right side of allthebeautifulthings blogsite and see her list of tutorials. She has a nice simple one on framing. She shows how she laces up her pieces on cardboard/mat board and then places them in the frame.
That's all there is to it, really. It's definitely worth trying some time.
And then you can go back to your stitching. How fun is that?!
Saturday, January 2, 2010
Finally, Some Quality Stitching Time!
Don't you just love the days AFTER the holidays, when you actually have the time to sit down and sneak in a bit of guilt-free stitching or knitting or reading or movie-watching or whatever else makes you happy?
Yesterday, January 1st 2010 was a deliciously grey, gloppy, gloomy day in Northern California - in other words, PERFECT STITCHING WEATHER.
Of course, the start of a New Year would have been the perfect time to start a New Project, and I intended to do just that. But I got sidetracked by an old project. Something I started a few months ago, got bored with, set aside and ignored...then VOILA -- it started calling my name yesterday from amongst all the other abandoned projects in the TO DO PILE, and so I picked it up again and started stitching on it.
Here it is. It's "SIERRA", a counted canvaswork design by Needle Delights Originals. I'm really enjoying the different stitch patterns - all easy and fun to do:
(Please forgive the less-than-wonderful picture quality. I was too lazy to remove the canvas from the floorstand, go to my office, turn on all the machines, scan & clean it properly. Instead I just snapped the photo in dim light and transferred it as is to my new laptop, just to see if I could do it that way, without moving off my comfy sofa...)
I am (of course) changing the colors on this design. And it has a rather holiday look to it, doesn't it - in green, cranberry and gold? Perfect project for the season, actually. So I plan to do a bit more stitching on it over the weekend.... (unless I get distracted by another project - which I'm guessing is going to happen more than once this weekend...ahem...)
Anyway, I also wanted to show you the wonderful stitching treats I got from my good friend, Laurel. She always seems to come up with some clever & useful stitching tool that becomes a favorite of mine. This Christmas, she made a holiday scissor fob with real red and green crystals. LOVE IT, LOVE IT, LOVE IT! And how nicely it matches my favorite green scissors...
And the little needle magnet (with the cute picture of the red bird sitting on the polar bear's head) has a hard, shiny, poofy top to it - like a layer of clear acrylic on it. She said she found a bag of these little squares in the scrapbook section of a local crafts store. I have NO IDEA what they're called, but they're really, really cute and the perfect size to make your own needle magnets. (And I'm certainly going to go looking for them next time I'm in a craft store!)
Anyway, that's what I'm up to this first weekend in 2010. I hope you're getting to enjoy some quality stitching time, too.
Friday, January 1, 2010
Happy New Year!
I spent the Christmas holidays at my parents' house in the Bay Area. It was a quiet and relaxing couple of days. Katie and I went on walks every day. (I enjoyed the subdued green and grey colors of a California winter; Katie enjoyed all the fascinating new smells.) Here are some photos I took on our walks:
an old apricot orchard
moss-covered oak trees
bare branches in a winter sky
And after a long walk along wintery trails, it's always nice to return to the warmth and brightness of home
HAPPY NEW YEAR, EVERYBODY..... Hope you're keeping warm and cozy and of course, doing some stitching!
an old apricot orchard
moss-covered oak trees
bare branches in a winter sky
And after a long walk along wintery trails, it's always nice to return to the warmth and brightness of home
HAPPY NEW YEAR, EVERYBODY..... Hope you're keeping warm and cozy and of course, doing some stitching!