Friday, February 26, 2010
Friday Flowers: Camellias
It's that time of year when camillias are starting to bloom in Northern California. And it's always a pleasure to see their pinks and reds and whites unfolding in such frothy abundance. It's fun to walk around the neighborhood and look at all the different kinds of camillias showing off....
So I thought I'd share a bouquet of ruffly camillias with you - focusing on just the red ones this time. These flowers come from the bushes just in my yard (and my neighbor's too)...I love all of them, but I'm particularly mesmerized by the speckled and striped ones - as if an artist hand-painted each petal for a dazzling effect:
Have a Happy Frilly Friday!
Wednesday, February 24, 2010
Thanks, Jane!
I've been following Jane's Chilly Hollow adventures as she begins working on the Tony Minieri piece, "STARS FOR A NEW MILLENIUM." Watching her careful step-by-step process has inspired me to pull out my MILLENIUM piece, which I started a few years ago and haven't touched in a long while.
I'm enjoying watching Jane as she thoughtfully considers her (many) options regarding color choices for her piece. She's even created a blog poll for interested readers to give their opinions on which colors/threads she should use. And there are a LOT of different threads used in this piece, so it's smart to plan ahead, before you start stitching.
Having said that, I must confess that that's not the way I'm tackling this project. Instead, I pulled all the possible threads I might want to use - as shown in the above photo (which has created a big knarly mess, frankly...)
My foundation variegated thread is one that I dyed myself - in my favorite pink & green combination - with some lavender and apricot thrown in for a little added spice! (This combination is similar to Caron Collections' 003 - "Meadow" or 088 - "Mountain Meadow" colors, which are favorites of mine, because they have a base green color plus pink, blue, apricot, yellow, lavender accents - allowing you to pick your favorite pastel accent color.) Below is a close-up of a few of the blocks, plus the variegated thread I'm using as the foundation...
This is such a large, complex piece, that the best way to tackle it is to focus on each block at a time. And each block is a stand-alone masterpiece by itself! So that's the way I've approached this big project: working each block as a separate item, mixing and blending threads to make each block work to my color specifications.
Anyway, this past weekend I waded back into the project by working first on the easier border and sashing (to re-familiarize myself with the design) then I continued on to get one more block finished - TA DA - thanks to Jane and her own Millenium adventure. (See Jane... I DID start stitching on it again!):
Surprisingly, I'm using more lavender and apricot threads than I expected. The lavenders are becoming the "zing" accent color, and the apricots are becoming the lightest "brights" in the piece. Totally unexpected -- but I'm letting the piece talk to me, and dictate the colors I use, block by block. It should definitely be interesting to see how this turns out!
Anyway, I wanted to thank Jane for getting me re-enthused about this large counted canvaswork piece - it's definitely a heirloom project... And if other stitchers out there are also working on their MILLENIUM pieces, please feel free to share your colors and stitching experiences as well, so we can all share this wonderful stitching adventure together!
Monday, February 22, 2010
How Much is that Doggie in the Sampler?
The one that I showed you last week in my Hollyhock House sampler?
The one with the spots? ... She's not for sale.
That's KATIE, my part-Wire Haired German Pointer mixed with (I'm guessing here) a little bit of obsessive (in a nice way) Border Collie.
It occurred to me this weekend that all you dog-loving stitchers out there might like to have the graph I used to add Katie to my sampler. I fiddled around with her shape to get the right coloring in a very small area, but you can certainly adapt the design to suit your dog's size and coloring. Here it is for you to copy and use, if you'd like to add your dog to any sampler you're working on:
ANYWAY....my Katie Lou is a rescued dog, from 'way up in Northern California's Lake County, where (I suspect) she was a rejected hunting dog that was abused my some male (she's wary of all males, especially ones carrying sticks, unbrellas, skateboards, anything long and pointy) and she's terrified of loud noises (like fireworks, backfiring cars, anything remotely sounding like gunshots.)
Katie may have started her life as somebody's throwaway trash....but now she's my TREASURE - a smart, sensitive, priceless companion and I'm so grateful to have her in my life!
Friday, February 19, 2010
Post Script to Yesterday's Blog
I forgot to mention on yesterday's posting that the delicious piece I showed you at the bottom (shown above) is a design by Gay Ann Rogers called "Hollyhock House."
I love miniature things - especially houses - and this stitched version of a miniature house was irresistable! And I must say, I've loved stitching every bit of it. Here's the lower portion of the design, thus far....
I've changed the color palette a bit, with more springy pinks and greens and blues. The flowers at the bottom remind me of sweet peas (one of my most favorite flowers) so I'm quite pleased with them.
And I couldn't proceed further with stitching the living room decor until I figured out how to add my dog Katie into the design (which originally had a cat beside the stitching chair.) Here's the stitched version of Katie up-close:
VOILA!! Now that she's in the picture, I can continue stitching.... And, because I'm enjoying stitching this piece so much, I'm taking it slowly and enjoying the process, stitch by stitch.
Please visit Gay Ann Rogers blog and website, if you're curious about seeing more of her luscious designs....They're really splendid, and each one is truly a delectable work of art!
Thursday, February 18, 2010
Why I Like Scroll Bars
Like most of you, when I start a project one of the first things I consider (after pulling threads and picking out the canvas color, of course) is whether to mount the canvas on scroll bars or stretcher bars. There are quite a few things to consider.
How big is the project? For small to medium projects, I like to use scroll bars. Although, small and medium projects can be easier to stitch on stretcher bars than a larger piece... For a really big canvas - painted OR counted - I waffle between scrolls and stretchers. Mostly I prefer scroll bars, because I can get closer to the work, which I REALLY like. Other times, I prefer to tack the big canvas to stretcher bars so I can see the whole design while I'm working on it...which becomes crucial if you're balancing colors and threads thruout the design.
What type of ground is it - mono canvas, Congress Cloth, or linen? I find that mono canvas is pretty darn tough and holds up well on scroll bars or stretcher bars - much better than rolling it up in your hand, that's for sure! Congress Cloth, while a bit stiff, can be easily creased if folded, so putting it on bars keeps the canvas flat and crisp. (I usually iron my piece of Congress Cloth before attaching to bars and stitching, so it starts out flat and crisp). And with linen, which I think is a pretty tough fabric as well, you may be an "in-hand" stitcher (which links you with a long tradition of stitchers stretching back thru time) or you may be a scroll bar stitcher. I have enjoyed cross-stitching in-hand, but I prefer putting my linens and other fabrics on scroll bars before I start stitching.
Will there be only flat stitches, or lots of raised, complex stitches? If you're going to be stitching lots of fancy stitches, or ones with long loose stitches, stretcher bars will be much easier on your canvas/work. That being said, I must admit that most all of my quilt designs (that use longish diagonal satin stitches) have been worked on scroll bars, and I haven't had any problems with the long threads being "rolled" on scroll bars. (On the other hand, I don't keep my quilt designs on the scroll bars very long; I usually complete the project in a few weeks or so.)
Other things to consider are:
What types of threads are you using - cottons or silks, rayons, metallic or wool?
Is it a travel project (one you'll carry around to stitch-ins or guild meetings, packing it in and out of your car)?
How quickly will you be working on it - finishing it in a week or a year (or two)?
All of the things mentioned above have to be considered. But, I have to confess: I usually go with the scroll bars. I know myself well enough to know that if I put a large piece on stretcher bars, chances are it will be more awkward to work on - and then I won't stitch on it as much. If I mount that same large piece on scroll bars, it won't seem quite so intimidating; I'm much more likely to stitch on it; and it will get finished faster (and I'm much happier as a result).
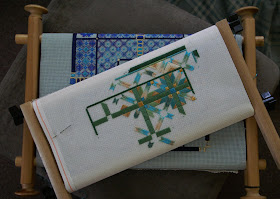
So I have a few techniques I use when I do mount a large piece of canvas (or fabric) on scroll bars. 1.) I'll cut long pieces of cotton batting and roll the hidden ends of the canvas against the batting, to protect the unstitched canvas, as well as soften and support the stitched portion of the canvas. 2.) I'll cover both rolled edges of the scrolled bars with fabric covers. Below is an illustration of how I quickly rigged up some muslin scraps (with safety pins, no less) to cover the top of a long project on white Congress Cloth:
I confess I was so eager to get started stitching, that I couldn't be bothered to stop and baste the muslin (or heaven forbid, pull out the sewing machine and sew up the edges). The lower edge has a fabric cover I sewed from scrap fabric, with a plain ribbon closure that can be pulled and tied to any width of scroll bars....You can get as fancy as you want with these scroll covers, but hey, whatever works - that's my stitching motto!
Thursday, February 11, 2010
A Valentine For You!
It's that time of year for flowers and chocolate and . . . valentines!
Here's a quick valentine to stitch up for yourself, or a special someone.
Yes, it's a SQUARE valentine, done in blackwork. (But you can turn it on point, add a tassel, and you've got a sweet little ornament. Also, please forgive my rather sloppy stitching -- I whipped up the model this morning while watching an hour or so of TV, so I could show you how it looks in stitches.)
What's so fun and quick about stitching blackwork is that you can pick and choose the various elements you want to use in your design. I think of blackwork as a mix-n-match type of stitching, because you can play around by adding or subtracting easy elements to create totally different patterns, depending on your needs. Below is a picture of the two different elements that were used to create the whole valentine design. The GREEN ARROW shows the first element. The ORANGE ARROW shows the second element.
Either of these elements can be stitched by themselves -- imagine a row of either element, to be used as a border around a small sampler. Or create a row of these elements in a band sampler. Or they could be stitched in a monochrome color as a background pattern for a painted canvas. And for this valentine, by combining both of those simple elements, I've created the more complex elements shown on the right side.
I've stitched this on 25 ct. linen Congress Cloth (so it has a slubby look) with a variegated Wildflowers-type thread. The variegated thread adds a bit of "color confusion" for your eyes.... If you stitched this in a solid color, it would look more traditional and quieter! Also, because I stitched it so small, on 25 ct Congress Cloth, the design is rather bunched together. For a more lacy and airy look, try stitching on Hardanger cloth (22 ct), Aida cloth, any evenweave fabric, or even 18 ct canvas. You can also move the elements further apart, by just a thread or two...
And you can see that I've added a few gold beads for a little "bling".... and there's also a bit of red metallic stitched in the small valentine flowers. The fun thing about blackwork is: you can add as much or as little accent colors/beads as you want. You can be the designer!
So, if you want to play around with this little blackwork valentine, please check out the FREE PATTERNS page on my website and print out the page for your stash.
Anyway, HAPPY VALENTINE'S DAY and I hope you enjoy some special stitching time this weekend...( some chocolate and flowers would be nice, too!)
Tuesday, February 9, 2010
Four Seasons - in Stitches!
Recently, a stitcher emailed me with an order for four of my rectangular "Impressionist Collection" patterns. She said she wanted to stitch them all and then rotate them each season. Wow, what a great idea! I must confess that I never thought of these four particular designs as seasonal representations, but now that someone has pointed it out to me, I can see how well that works.
Above is MORNING STAR (which could also represent spring).
Below is SAPPHIRE STAR (which could represent summer):
Here's PRAIRIE STAR (which does have an autumn feel to it, doesn't it?):
And finally, here's VICTORIAN STAR (with antique-y Christmasy colors):
Originally, I was focused on trying to create abstract designs that had a stained glass look to them, featuring variegated threads and easy stitch patterns. I also wanted to design something that wasn't so darned SQUARE, for a change of pace -- hence the long rectangular layout. (FYI: each of these designs measures apprx. 7" by 12" on 18 ct. canvas.)
I particularly like PRAIRIE STAR, because it definitely has a Frank Lloyd Wright look to it, and seems to echo the "prairie style" stained glass of that era. And VICTORIAN STAR definitely reminds me of the pieces of stained glass art found in older homes around the turn of the century. I also like that piece because it can be displayed in a horizontal frame as well. Anyway, I'm glad to hear that stitchers are still enjoying stitching these stained glass abstracts!
Friday, February 5, 2010
Friday Flowers: Peeping Primroses
Even though we've been pummelled by rain this season, my primroses are already starting to poke their pretty heads up through the mud. For those of you still buried in snow, I thought you'd enjoy a preview of coming springtime attractions... May these flowers brighten your day -- and perhaps inspire you to do some early springtime stitching!
Happy Friday!
Happy Friday!
Thursday, February 4, 2010
Raindrops Keep Fallin'.....
Sorry I've been away so long. I've been in a kind of blog slump. I guess it's because I've been in a bit of a stitching slump as well. That happens every now and then. I used to worry about it, but then I realized that eventually some project or some neato idea will come along and I'll get hyper-excited about stitching all over again.
In the meantime, I've learned to honor those fallow periods. I just have to be patient and wait for those creative winds to start blowing again. And when they do, they fill up my sails and my little boat glides into fresh, new, uncharted territory....and woo hoo, that's always worth waiting for!
Speaking of wind and water, here in Healdsburg we've had lots and lots of rain in the past few weeks. During our big rainy week, I ventured out to see how high the Russian River was rising. The river is several blocks away from my house, so it's not a threat by any means, but we all keep track of how much rain is falling by how high the river rises under the old bridge. Here it is at the high stage a few weeks ago:
I'm sure all that water makes the local steelhead trout happy.... which ahem, leads nicely into my next watery subject -- TA DA -- my new LEAPING TROUT COLLAGE is done! Here it is, complete with fishing pole and assorted lures:
I've stitched the model with a variegated thread that reminds me of a spring/summer landscape in blues and greens (I used Watercolours and Waterlilies 257 - "Spearmint"). But if you'd like to stitch it in a more muted and autumnal palette, you can use Watercolours and Waterlilies 024 - "Twilight" instead.
By the way, the Waterlilies thread - in a simple 2-ply four-way stitch - is used to create the watercolory effect of the background. I love stitching the backgrounds with a variegated thread, because the overall effect is so lovely. Sometimes, like in this piece, I'll use the same thread color/number as the thicker Watercolours, to create a very monochromatic look. Other times, I'll choose a variegated thread that compliments one of the designs main colors - like green, gold, brown or blue. Using a plain color for the background allows the collage boxes to pop a bit more. It all depends on how you want the piece to look.
As for the LEAPING TROUT COLLAGE boxes, I used patterns that looked "watery" to me, such as these fun wavy lines
and reflective zig zags
All in all, it was a very fun (and fishy) piece to stitch.
P.S.: If you're interested in ordering this new LEAPING TROUT COLLAGE, please visit my website (Laura J. Perin Designs) for more information.