Monday, January 30, 2012

Mini Mystery Monday #5

Time for another little mystery project -- something very fast, very fun, and very easy!

The finished size of this piece is apprx. 4" x 4" on 18 ct. canvas; design count is 68 threads by 68 threads. I stitched the first design on white canvas, so you can use white or any light-colored canvas you want - eggshell or light blue or green....whatever goes with the threads you choose. (I also stitched it a second time on colored canvas, but more on that later on!)

We'll be using a very simple palette again: just one variegated thread with two different metallic ribbons. Chose one bright, "sharp/scratchy" metallic and one soft sheen, muted/dull metallic. To show you what I mean, here are the threads I used:


And we're going to start our mystery project with the very same element we used in Mini Mystery #4, the separated lone star (the divided star? the exploded star??):


And the center graph looks like this:


But this time we're going to make nine of these stars with a variegated border as well. So here's your graph for the first part of this mystery:


That's really all there is to the first part of this design, so go get your threads and start stitching! I'll see you next Monday with the next layer of stitches....

Thursday, January 26, 2012

An Old Favorite

I was doing a bit of pattern printing this week, and every time I print an older pattern of mine, I find something new and different to like about it.

Take FEATHERED DIAMONDS, for instance.... one of my first designs done 'way back in 2000.


It only uses two skeins of any variegated Watercolours thread you like, plus 2 skeins (or 1 ball) of #5 pearl cotton in ecru, or any pale background color.  I think I used Watercolours 51 - "Abalone" on this original model.... but everytime I print it out I'm struck again at how timeless this design is, yet complicated enough for the eye to find something interesting to look at!

And without lots of thread color changes, you get the chance to really absorb the luscious colors in the solo variegated skein you've chosen for the piece. If you have a particular thread color you love, this would be a great pattern to highlight it, I think. Really, this design is an elegant feast for the eye...yet retains a bit of Amish simplicity, too.

I love all the little triangles that edge all the border strips.  I love the central diamond square by itself and think it would make a sweet little ornament just this size:


But then I really, really like the wavy ecru border that frames the center, and would like to make another ornament that shows THAT off as well...


And then I wonder what it would look like with metallic threads used in the circle motifs found in the corners or in the wavy ribbon border... And really, there's no reason why a solid color couldn't be added to the mix in  the outer borders or in the wavy ribbon lines....

Sigh.... so many options to play with in this one simple pattern...  I wish I had time to explore them all!

Tuesday, January 24, 2012

Stops and Starts

I thought I'd post a picture of the latest Prairie Schooler "12 Days of Christmas" Santa I finished last week. It's the "seven swans a singing" square and I thoroughly enjoyed stitching the swans in this one:


I think it's going to be the last one I work on for a while. Time for the Santas to go back in the Christmas vault, while I pull out a few half-started new designs for 2012...

The first one I'm focusing on is something I'm calling ACE OF DIAMONDS, because it's got lots of diamond motifs thruout the piece. And it's worked in what I consider my "January colors" -- icy blues, teals, and purples (I'm using Watercolours 192 - "Elderberry Wine"  - one of my favs, because it's so incredibly deep and rich and has such a good spectrum of colors to play with)...


There is a lot of icy blue and purple metallic in this piece, but the scanned image just doesn't pick it up. Sigh. Believe me, this is a sparkly, spangly piece with plenty of fun zig zag rows and all sorts of diamonds to whip up....

After working thruout the holiday season on lots of basketweave stitching, it's pleasant to return to some satisfying geometric work again.  So tonight I'm going to be very cozy in my evening stitching station, watching tv and getting back into the groove of my January blues stitchin' mood! ...

And oh yeah, so long, all you santas... I'll be seeing you again next winter!

Thursday, January 19, 2012

A New Cyber Class

Well, I'm so pleased to report that the folks at TRIPOD have fixed the bugs that were bugging my website.

Whew! So now I can finally say that all the newly added PAYPAL buttons seem to be appearing - Woo Hoo! That makes things easier for you and me both....

And TA DA -- my new Cyber Class listing is finally visible to the world. Double Whew! Here's the next class that I've created -- SPRING TULIPS...

I wanted to surprise all you stitchers with something a little bit different this time. Something that wasn't counted canvaswork geometrics... or the shadow stitching on printed canvas... So why not a springy floral bouquet of three tulips to celebrate the arrival of spring? And this time, the project is worked on 24 ct. Congress Cloth with stranded Splendor silks. And you'll even have a choice of red, pink or yellow tulips! Here's a closer look at the class project:
In this class (which will start on March 17th) you'll be drawing the 6.5" x 8.5" tulip image onto your fabric yourself. Then filling in the areas with stitch patterns that create the illusion of satiny petals and twisty leaves. The background area is a floral blackwork pattern that is stitched with a variegated ThreadworX thread, and includes a subtle bit of sparkle with green Kreinik Blending Filament. If you are interested in trying out a new stitching technique this spring, please visit my new and improved website and click on the LJP CYBER CLASSES menu at the top.

Monday, January 16, 2012

Mini Mystery Monday #4, pt. 3

Time to wrap up this small mystery project!!

Let's begin by adding a sweet and simple border around your snowflake design.
And I've come up with two versions, so you can decide which one you want to stitch on your project.

Here's the first one that I stitched on my model:

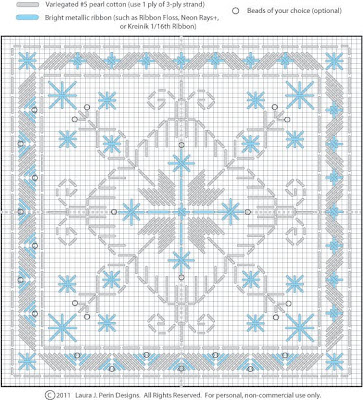
Start at the CENTER of the border row, counting up TWO THREADs from the tip of your snowflake, and work the zig zag row first, using 1 ply of the variegated Watercolours. Please note that each of your zig zag shapes are made up of four stitches (as numbered on the graph), until you reach each corner -- and that last corner shape is made of FIVE stitches! Next, add the sparkly metallic Smyrna Stars inside the zig zags and the Smyrna Squares in the corners - using 1 strand of your bright metallic ribbon color. Finally, do a simple backstitch row on either side of the zig zag border, to give it a clean finished outline. TA DA... FINI!

But wait a minute... if you want to try another easy border that you'd like to add beads to, stitch this one in the same manner described above:


And here's the graph for the whole design (with both borders included in the graph):

And as you can see in the whole graph, I've shown a few places to add small beads around the snowflake, if you want a little bit more sparkle.

So your sweet new mystery project should look something like this:

I hope you've enjoyed stitching this project which combines a few diagonal satin stitches with a little bit of blackwork. It's fun to see how different techniques can be combined in interesting and easy ways, don't you think?   And, here's a surprise for you: look what happens to this design when you do it in white #5 pearl cotton on RED canvas with a touch of pale gold metallic ribbon:


Isn't that totally amazing how different it looks? Makes me want to go back and stitch the previous Mini Mystery pieces on red canvas as valentine ornaments!!

So give it a try.... this little design lends itself well to all different types of threads, so I hope you get a chance to play around with it and find your own unique combinations....

Tuesday, January 10, 2012

A New Design for The New Year

I'm so excited to show you my first new pattern for 2012!
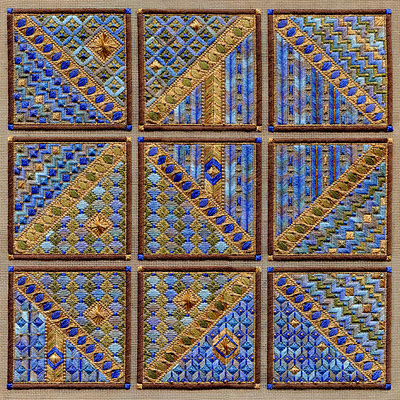
It's called "STAINED GLASS WINDOWS" and it looks like this:


It's a larger piece than most of my other designs - 12.5" x 12.5" stitched on 18 ct. brown mono canvas.

The inspiration for this larger design actually happened after I designed a smaller "Triptych Mystery" piece for NEEDLEPOINT NOW magazine (which ran in their Sept/Oct, Nov/Dec, Jan/Feb issues). Here's that whole of that smaller design:


I enjoyed stitching up this 3-part piece so much, that I stared and stared at it when it was hanging on my project wall. After a while it struck me that I could expand the patterns into a nine-patch layout, using the brown-framed squares as if they were windows. But windows of what? Well, the rich jewel-toned colors of Watercolours 231 "Ethiopia" reminded me of old cathedral stained glass (I toyed with the idea of naming this pattern "Cathedral Windows"), so I went rooting around my variegated Watercolours skeins, looking for other colors that would look good inside "wooden" brown frames....

I came up with three different colorways: the blue & green one I used on the model - Watercolours 289 "Lexi's Blue" (which is a new color from Caron Collection); a purple & orange version which uses the same Watercolours 231 "Ethiopia" as the Triptych Mystery piece (which I think is totally stunning and dramatic); and a red & gold version that also uses a new Watercolours color 290 from Caron called "Mystery Mix". Here are snippets of the two other colorways I list on the pattern:

The Purple & Orange version
The Red & Gold version

If you look closely you'll see that the smaller design is the foundation row for the middle of the STAINED GLASS WINDOWS piece, but I expanded the patterns, added a few more thread colors and added LOTS more "bling" with metallic accents and of course, gold beads. In fact, one of the fun design elements was incorporating one unexpected gold motif within each square of the design, so overall there would be lots of interesting treasures to look at.

Each of the squares has two different stitch patterns in it, plus a gold band running diagonally across the middle. And even the gold bands alternate between blue and green rows! I've also separated the two color families of blues and greens by working them in alternating rows of the large diamond shapes, just to create another subtle design element. Of course there are plenty of subtle color and pattern changes within the overall piece, but I chose lots of fun patterns (nothing difficult) so it was an absolute joy to stitch, block by block.

Here's an up-close look at the middle block so you can get a peek at some of the elements:


And after I had finished stitching the large model, and it too was hanging on my project wall, I realized that just FOUR of the squares could be stitched to create a very interesting smaller piece. So,I've included suggestions for a four-square version in the pattern for your additional stitching pleasure.

Now I must also tell you that I was so focused on stitching this pattern in rich "stained glass" colors that I reluctantly had to dismiss other color combinations or favorite variegated threads because they didn't "fit" with the brown window frames I'd decided upon. But this design would look fabulous in ANY OTHER COLOR COMBINATION you can think of. Don't limit yourself to the brown squares... but try another dark color for your borderlines, then create your own fabulous color confection. (I'd love to see this in a monochromatic version in whites and creams or maybe pale pinks or aquas??) There are sooooo many luscious colors to play with, it's hard to choose just one to use in a design, so I'm counting on you to surprise me with whatever colors you can find!

So if you're interested in this new STAINED GLASS WINDOWS design, please visit my website: Laura J. Perin Designs real soon..... And psssssst: I'm pleased to announce that I've been able to update MOST of my website so there are PAYPAL buttons for each item (there are a few glitches that the website company is still working out for me)-- making it easier to purchase my designs.

Monday, January 9, 2012

Mini Mystery Monday #4, pt. 2

Are you ready to add some sparkly metallic color to your new design?

You should have your center star and surrounding "snowflake" stitched by now, so let's add some glittery excitement to your work so far...

There are several places to add some Smyrna Squares and Stars in the design you've already stitched. Using one strand of whatever metallic ribbon thread you've chosen, go ahead and follow this graph to add a bit of bling to your project:

And although I'm sure you know how to make those fun Smyrnas, here's a detail graph to use as a reminder:

How do you like your little snowflake motif now? Pretty cute, huh?

After you have your metallic stitches added, step back a moment and take a good look at this design. It should look something like mine:

Just as it looks right now, can you see how you could create a larger design by stitching four more of these snowflakes, and arranging them in a square so they just barely touch (leaving 1 or 2 canvas threads between each snowflake)? Each snowflake motif is roughly 3.5" in size, so if you did another three of them you could create a larger blackwork design that measured roughly 7" x 7" on 18 ct. canvas. (The design would be considerably smaller if you stitched it on 24 ct. Congress Cloth, as well...) Using some computer magic, here's what it would look like:

Next Monday we'll add a quick border that repeats a few of the snowflake elements and before you know it, you'll have another little project finished!
See you next week...

Saturday, January 7, 2012

Marching Right Along

I mentioned in my last Prairie Schooler posting that I was hoping to get the next row of Santas done in the "12 Days of Christmas" series. Well, TA DA - I met my goal and finished the row this week! And here it is (please ignore the scanner blip):


It was so fun to work on the parrots (for the "four calling birds") because it called for bright green and turquoise, for a change!


Then it was also fun to do the "six geese a-laying" with Canada Geese - one of my favorite birds!


But really, the "five golden rings" block was a total blast to stitch! The PS designer who thought up the golden hoops idea was totally brilliant, don't you think? And after stitching the little black dog, I decided to personalize it a bit to make it look like my half-pointer dog, Katie. I delicately added a bit of white on the dog's legs, neck and belly (to suggest Katie's feathery legs and tummy) so now it looks like this:


It tickles me no end to look at it, since it suits her playful personality -- she's ALWAYS ready to play fetch with just about anything, and I know this is JUST the way she'd greet Santa! Anyway, I've started the next row of Santas, but I'm not sure if I'm going to have the focus to continue much further....

It's time to get back to a whole bunch of new projects I'm designing for spring. They're hanging on my grid-wall, half-started and ready to pick up again and finish.... Sigh, I may have to leave the ol' Santa project for next Christmas to get finished.... but you never know -- ho, ho, ho!

Monday, January 2, 2012

Mini Mystery Monday #4

HAPPY NEW YEAR, EVERYONE!

How are you starting your new year? By reading lots of new blogs? Watching the colorful Rose Parade? Getting out the snacks in preparation for watching lots of football games or movies? Or starting a new stitching project after you've done all of the above?

I've decided to start the New Year with a simple but slightly different type of mystery ornament for you. It's small and fast and you'll see a lot of the background canvas. And because it's the first ornament of winter, let's get a piece of white 18 ct. canvas - at least 6" x 6" in size. [After you stitch this one up the first time and see what it looks like, you might want to play with it on different colors of canvas... but more on that later!] The finished size of this small design is 4" x 4" on 18 ct. canvas, and the actual thread count is 68 by 68 threads. If you want to try a smaller version on 24 ct. Congress Cloth, your design will be 3" x 3" in size - and you should use finer threads, like Caron Wildflowers (or any variegated #8 pearl cotton) with a finer metallic thread such as Kreinik # 8 Braid or Rainbow Gallery's Treasure Braid Petite.

So....first of all, I want you to think about what COLORS come to mind when you think of JANUARY. Do you think of blues and silvers? Lavenders and purples? Aquas?? Hot Pink?!? In any event, go get a variegated thread color that evokes wintry January for you (you'll only need half a skein of a Watercolours thread, if that, so go looking thru your pile of used threads for this project)... Then pick out a sparkly metallic ribbon thread that matches your variegated thread (like Ribbon Floss, Neon Rays+, or Kreinik 1/16th Ribbon).

Since I think of cool blues and purples for January, I chose a medium bluey/aqua combo, similar to Watercolours 019, "Tropic Seas" with a really icy blue Ribbon Floss 144-009, so my thread palette for this project looks like this:

Yup. Just two threads needed for this sweet little project. That makes it easy, doesn't it?

Okay, once you have your threads and canvas mounted on bars, find the center of your canvas and stitch this separated star motif, using 1 ply of your 3-ply strand of variegated Watercolours:

The "c" in the middle of the graph represents the CENTER of your canvas, so count outwards from the "c." And your star should look something like this:

Once you have that star motif stitched, you can continue with the next part of the central design, which is a sort of a snowflake design, done in BLACKWORK! But you're not using a black thread - no, no, no, you're going to continue stitching with 1 ply of the variegated Watercolours thread you've chosen. Anchor your new thread on the back of the star you've just stitched and then work outwards using this graph:

Work your blackwork design in a Running Backstitch, which is done like this:

I highly recommend using this stitch (instead of the standard backstitch, which can leave "shadow stitches" on the back of your work that show thru to the front - especially when stitching on the large 18 ct. canvas) for two important reasons:
1) it keeps the colors on your variegated thread flowing nicely together and doesn't create abrupt color changes;
2) it's tidier, as you move the stitched line over the canvas you don't create any messy "shadow stitches" that show thru to the front.

So there's the first part of your next Mini Mystery project to work on. I'll see you next Monday for the next installment, where we'll add a little sparkle to your blackwork!