Saturday, July 31, 2010

A Blast From The Past

Last week was one of the most unexpectedly busy and unusual weeks I'ver ever had. Not only did I have a flurry of calls and orders from stitchers and stores all over the country for my new pattern, ONE LONG PANEL, but totally out of the blue, I got an email/query from a friend I'd lost touch with many years ago.

Thanks to this wondrous thing called the worldwide Internet, my old friend Liz and I have reconnected and it's been so much fun talking to her again. After firing off a string of emails back and forth, we agreed to meet "face to face" in a video call on SKYPE. Once our computers connected to each other, we were able to see one another, and of course, the first thing we both said to each other as we were jumping up and down is: "YOU HAVEN'T CHANGED A BIT!!!" And then we were OFF, chattering and laughing and getting caught up on 30 years worth of stories.

Here's Liz (and her wonder dog Lucas) from umpteen years ago, when we first met...and yes, I'm the one taking the picture:


That's my horse, Final Appeal, a Quarter horse I got straight off the race track who didn't know diddly except running hard in a straight line. He was SOOOOOO young and nervous and green and inexperienced. And frankly, so was I.

Enter Liz Mooz, horse trainer extraordinaire! With the patience of a saint and more contagious enthusiasm than anyone I'd ever met, she spent a lot of time working with me and Appeal so that eventually, he became a calm and collected pleasure horse, and I became a much more confident rider.

Those years I spent riding and working with Liz, going to horse shows and just plain revelling in all that horsey-ness were truly some the best years of my life. Eventually our paths separated and Liz moved out of state to become a nationally known horse trainer and breeder of the most extraordinary horses, while I found my own niche in the stitchery world. Incidently, Liz is now a personal chef in the Lebanon, Indiana area (check out Liz' blog: The Nutrition Police News.....which might actually force her to write some more on her blog - big grin here...)

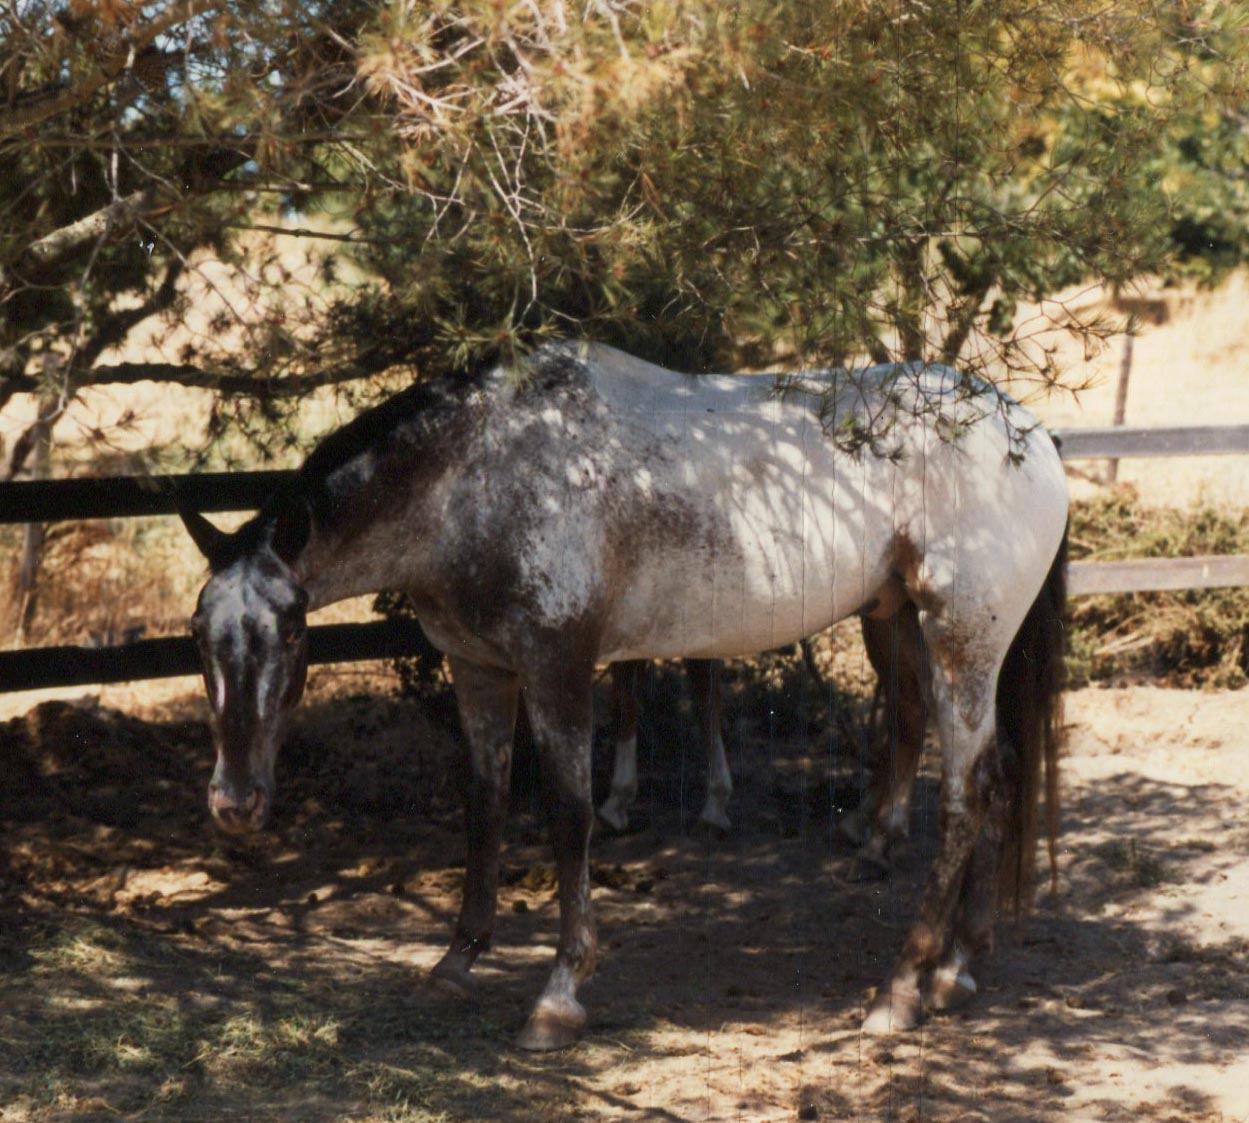
Liz, I can't tell you how glad I am you contacted me after all these years....and I can't wait to SKYPE again and catch up on aaalllll the other stuff we have to share with one another! And oh yeah Liz, here's a photo I found of my beloved Appaloosa, Stormy - the club-footed, one-eyed jumper. Remember this terrific guy???


(And All You Stitchers Out There: if you ever think about old friends you've lost touch with, why not try Googling their names and see if you can find them online. The experience is one I would highly recommend!)

Friday, July 30, 2010

I Take a Stand

Several stitchers have asked me about the floorstands I showed in some of my recent photos. I have two wooden floorstands that I use. I got both of them at the old Cross Stitch Festivals many, many years ago.

The first one I call my "UFO" stand, since I can't remember the company that made it. They also sold scroll bar sets that had nice wooden knobs and their product slogan was "wood against wood and metal against metal" which was supposed to keep all the moving parts durable.


I like the long dowel arms on this stand, because I can make them any length I want, to fit any size project. It works best with scroll bars, but I've also used it for projects on stretcher bars too.

My other floorstand is a Gripit Plus model that I got one year when my booth was next to theirs at a craft & quilt show. Here's what it looks like:


What's really great about this floorstand is how flexible it is and how you can make the project come to YOU, instead of stretching across the project. There are so many moving sections that you can position it any way you want. I especially like the way the scroll bar section tilts down left and right, so you can slant the project lower on one side so you can snuggle up nice and cozy to your project.

Since I always have so many projects going at once (and they're all on different scroll or stretcher bars), I seldom leave just one project attached to my stand. So I have also rigged up a way to use this stand with other types of scroll or stretcher bars. I simply use a set of small vice grips (you can find a variety of these in any hardware store) to clamp my project to the protruding bars, like this:


All that being said, I have no idea if either of these models are still available. I do know that a stitching friend of mine (Lou in NC) just ordered a large wooden floorstand from K's Creations and she is absolutely delighted with it because it doesn't wobble and it fits up to her comfy stitching chair, has a cool handy tray for all her tools - plus it folds down to a flat storing size.

If you're interested in getting a floorstand for your growing stitching obsession, why not try researching a bit on the internet? Think about the qualities you want in a stand, then visit some of the many online stores to see what they carry. I'm sure you'll find something that fits your needs perfectly!

Wednesday, July 28, 2010

A New Design

I try to release a new design every month, if possible. And this month I've got something a little different to show you. I call it ONE LONG PANEL (well, really, I was stumped and couldn't think what else to call it). I was inspired to create it after flipping through a home decor magazine one day and seeing a plain, long, rectangular solid color - framed - on the wall of a home. I stopped and thought, "Shoot, a stitched panel would be much prettier than that!" And I promptly set out to design something similar. And I also confess that I happened to have a lovely long frame that would fit the design perfectly....so here's what I came up with:


It's 4.5" x 16" long and I stitched it on 18 ct. tan mono canvas (the old "brown" canvas). I've used a variegated Watercolours (257 - Spearmint) as the foundation color, and then matched up a few solid color #5 pearl cottons, plus a few Ribbon Floss colors and some gold metallics as well.

Here's what some of the sections look like up close:


I picked five fun and elegant main patterns, and as I was stitching I realized I could separate them with four entirely different bands - to create a long band sampler, but one that definitely wasn't traditional or old-fashioned! And frankly, it was kinda fun to stitch something that was long and rectangular, instead of the usual square shape.

And THEN I also realized this design is a truly great one for changing colors. In fact, I've included on the back page four other colorways for this design, in peach, purple, pink, and blue. But you don't have to stop there -- this is a great design for stitchers to choose their OWN colors to match their OWN decor! (Stitchers can also change the canvas color too, if they want a different color background...)

So, if you're interested in a new shape for stitching, please check out my ONE LONG PANEL on my website.

Monday, July 26, 2010

Bonjour, Mon Amis!


Last week I finally finished this little canvas of the French hotel.

After doing all the architectural elements, I was able to get to stitch the fun dimensional stuff --the flowers! Here's a close-up of my flower boxes:


I stitched the foliage with variegated greens; first the dark to medium greens, then a lighter green on top.... all in very haphazard lazy daisy stitches going every which way.

Then I added the flowers on top, using two pink Ribbon Floss colors. I made large french knots (three wraps around the needle) so the flowers would be big and floppy. For the flowers above the hotel sign, I added smaller french knots (only one wrap around the needle) in pale yellow Ribbon Floss. The canvas actually only had greenery above the sign, but I decided to add a little bit of soft yellow so there were even MORE flowers on the canvas.

Notice how I made a doornob using gold beads... I really like the look of this polished addition! And if you look carefully on the windows, you can see a few diagonal stitches I placed on top, after I stitched both windows in plain ol' tent stitch. It just looked like a window screen, so I decided to try adding some random slashes of silver thread, to see if it would look more like window reflections - and it does, especially at a slant. (But the metallic is kinda hard to see in the photos.)

So, HURRAH!, a canvas finished and ready to frame, a project crossed of the list ..... and now on to the next project!!

Monday, July 12, 2010

My Cozy Nook


Well, I've found another fun place to stitch in my house. This time it's in the kitchen nook. I have my breakfast here, with the golden morning light shining in from all the windows. It's a perfect place to sit and read while I have breakfast and Katie curls up on the rug underneath the table.

Then the other morning I thought, "Gee, this would be a good place to stitch, too." And I went and got one of my floor stands and a little project I'm working on for the kitchen, and VOILA!.... A new Stitching Station is born!

So I've been spending some of my mornings stitching away in the bright morning light. I even put my laptop on the table so I can listen to audiobooks while I stitch -- my idea of HEAVEN!

And here's the little project I'm working on:


It's a project I bought at a local ANG "auction" a few years ago that had not only the canvas, but ALL the threads needed as well. When I pulled it out recently I realized the hotel is the same color as the walls of my kitchen. So I HAD to get stitching on it so I could see it framed on the wall.

It's been fun stitching with threads picked out by someone else. I chose to stitch the hotel in clapboards instead of basketweaving the whole thing - thought it would go faster (done with Flax 'n Colors "Pumpkin Mousse"). And the shutters are all done in Pebbly Perle. I started tent stitching the shutters - both the black and white areas and GAD, was it HARD. The Pebbly Perle was too thick and tough to work in solid tent stitches, so I ripped out the white rows and left the black shadow rows, and then just laid long horizontal white stitches along the slat lines - it was MUCH easier to deal with, although my shutters are a little wonky! (But, hey, this is an old French building and it's okay for the shutters to be a little ancient looking, n'est pas?. Grin.....)


Currently, I'm stitching the windows with a very fine silver Kreinik Cord. You can see it in the photo, but I'm just tent stitching - tedious, but it does glint like glass windows. And I substituted my own hand-dyed thread for the walkway, instead of the greyish Gentle Arts thread that came with the canvas. I just saw the street paved in used bricks - so that's how I stitched it.

All that's left now are the leaves on the flower boxes. I'm using two different variegated greens and just placing lazy daisy stitches haphazardly all over. The really fun part will be putting all the flowers on top. The original owner of the canvas chose red silks for the geraniums. I'm planning to use two pink Ribbon Floss colors, just to maintain the pink "kick", just as the canvas designer originally painted. Oh, yeah, and I think the red door needs a doornob - maybe some gold beads??

I'll share the finished piece with you after I have everything stitched, but now I had better get back to it. I'm soooo close to finishing this piece and I'm nearly there.....