Friday, April 23, 2010

Friday Flowers: Blue Iris

In-between all the rain showers this week, my irises have started to bloom:


Which ties in nicely to my blogging theme this week: springtime kimonos. I thought I'd share another one with you....Can you guess which one?? TA DA -- It's my IRIS KIMONO of course:


Here's an up-close look at the different patterns used in this design, plus the irises along side:


All of my kimonos are stitched on 24 ct. Congres Cloth (apprx: 9" x 9"). When a store owner asked if they could also be stitched on 18 ct canvas, I said I'd stitch one up and see how it looked. Here's the same IRIS KIMONO stitched on 18 ct canvas (10" x 12" and equally lovely) in a different color combo:


Anyway, I hope this bouquet of irises - real and stitched - brightens up your Friday!

Wednesday, April 21, 2010

Apple Blossom Time!


I was printing up some of my kimono patterns to send to a store in Canada this week. It's been a while since I actually "looked" at these designs, and I was reminded of how enjoyable these patterns are to stitch - and look at. And the springy ones really caught my eye and I thought they might bring some springtime cheer to all of you too.... The kimono above is called APPLE BLOSSOM KIMONO, done with silk Waterlilies 088 ("Mountain Meadow") and a handful of pink and gold threads.

What I like about these kimono designs is how well-suited the rectangular blocks of the sleeves and body are for composite stitch patterns. The kimono shape provides the visual focus for whatever patterns you want to put inside of the kimono. Another great thing about these designs is how perfectly they show off variegated threads. The designs simply wouldn't look as elegant or complex if they were stitched with solid color threads. Here's an up-close look at the Apple Blossom patterns and how beautifully they showcase the variegated thread:


I developed a certain "formula" for these kimonos, in that I used smaller patterns inside the body areas, and then put the larger, coordinating patterns in the sleeves, and sometimes along the bottom of the kimono. I also discovered the soft rayon metallic thread called HI-LIGHTS (by Rainbow Gallery) that I used for all the kimono lapels because it had such a nice soft, shimmery sheen - like satin fabric.

Here's another seasonal design I call SPRINGTIME KIMONO (this is the pale version done with a now-discontinued Rainbow Gallery thread, but it's similar to Waterlilies 110 - "Hyacinth"):


I particularly love the little floral pattern that makes up the kimono body, as you can actually see lots of overlapping flowers. In this detail shot you can see that I picked out some random flowers at the kimono bottom and stitched them in metallic thread, to create a bit more texture and drama:


I also stitched SPRINGTIME KIMONO in a brighter colorway to see how it looked:


The great thing about these kimono designs is how adaptable they all are to changing the thread colors....A great project if you want to try mixing and matching your OWN colors!

In any event, HAPPY SPRING!!!!

Wednesday, April 14, 2010

It's a Dog's Life

Well, it took me long enough to realize that I really needed to stitch a dog collage. Duh. And what better dog to stitch than a black lab. (Yeah, I know and agree that each and every type of dog is great, unique and loveable, but I had to start SOMEWHERE - grin.)

Here's my new LABRADOR COLLAGE:


When I thought about labradors and all the things they love, I realized I had to create some tennis balls and sticks in one of the collage boxes. Here's the geometric version I came up with:


And what lab doesn't enjoy a good chew stick and rawhide bone?


The red band in the top portion of the design is similar to a collar I had for my own black lab-mix, Libby. (You may prefer to change your accent color to royal blue, if your dog wears that color instead.)

And I originally planned to make a plaid box, in the red/blue/green/gold color combo.But a stitching friend of mine who looked at the piece in progress said,"Wait! You HAVE to have pawprints! It's not a doggie thing without pawprints." And she was right. I totally overlooked the obvious choice of pawprints. So I added the pawprints and simplified the underlying plaid (and even managed to slip in some beads.)


Black animals are the hardest to portray. All that BLACK, don't you know.... And I decided to create a rather generic labrador (a compromise between the stockier English types and the leggier American types) so if you have a taller lab, a more delicate lab, or a labrador-cross perhaps, you might want to make a few minor revisions. In any event, here's my version:


And to be fair to all labrador lovers everywhere, I decided to make separate graphs for black, yellow and chocolate labradors. And they all look equally fetching in a red/blue/green colorway, don't you agree?

So if you're a labrador fan, check out this new LABRADOR COLLAGE pattern on my website. Or as a dog trainer might say: "GO FETCH!!"....or better yet: "SIT! STITCH!!"

Friday, April 9, 2010

Friday Flowers: A Yellow Bouquet

Are you all in a Spring mood yet? I am.

Flowers always perk me up and put a smile on my face. And this time of year, it's not even necessary to go to the store and buy flowers. Just go for a walk in your neighborhood and see what's in bloom.

I thought it was time to gather a yellow bouquet for you today:


Have a happy and sunny Friday!

Wednesday, April 7, 2010

What ARE Those Flowers?

I know some of you are going to ask about the stitched flowers on my masthead this month.

Those are anemones - a spring bulb you may be seeing in your area about now. They come in the most vibrant colors of pink, white, and periwinkley purple (a perfect match for DMC 333!) with a jet-black center button. I love them (well, I love most all flowers, really.)


The purple ones are my most favorite...although the red and white ones are darn cute, too. Here's another up-close view:


When I started stitching flowers, I was trying to replicate the flowers as realistically as possible, just using canvaswork stitches. If you look closely, you'll see that all the petals are stitched with the same pattern, but the stitch direction changes on each petal. That creates a light change as well, so the petals have the silky satin look of real flower petals and give the illusion of being stitched in different colors. Then I outlined them with a backstich in 1 ply DMC floss 310 to give them crisp, sharp edges.

I did several of my favorite flowers in this style (Dianthus, Amaryllis, Pansies, California Poppies, to name a few). The above pattern can be found in my Secret Garden Collection and is called ANEMONES. It is worked on 25 ct Congress Cloth with DMC floss.

Friday, April 2, 2010

Sweeeeeeet Vi-o-lets!

Sorry it's been so long since I've sat down and blogged. I guess I haven't been in much of a chatty mood. Instead, I've been in a focused design-every-idea-that-comes-into-my-head mood and I decided to run with it and see where it takes me. So, needless to say, I've been busy stitching up a storm. Really. (You should see the stack of started canvases on scroll bars I've got piled up in the corner of my office.)

So I reveal a finished piece to you today, as an offering that celebrates the beginning of spring. TA DA! It's called BARGELLO AND VIOLETS:


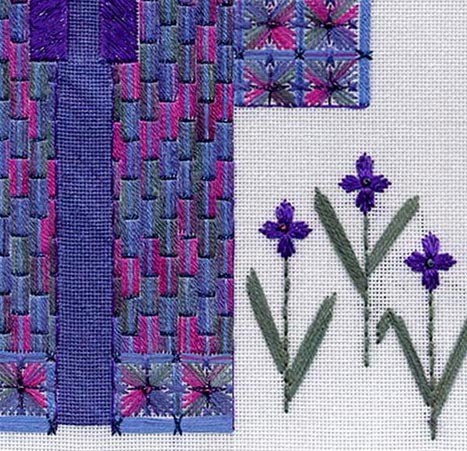
I wanted to try a four-way bargello piece using - you guessed it, surprise, surprise - variegated thread. This purple version uses Watercolours 259, "Garden Path" (a totally yummy color combo, I must admit) with green and purple #5 pearl cottons and a gold and purple metallic ribbon (I like Ribbon Floss, but it can be hard to find so I also list an alternate Kreinik 1/8th Ribbon color). [ASIDE: I also provide a list of threads to use if you want to stitch a pink or blue version.]

Here are the bargello colors up-close, as well as a bit of the outer border and easy background stitch, done with an antiquey looking #12 pearl cotton 437:


The bargello rows go really fast, so I had them all stitched quickly. And the soft metallic shimmer of the Ribbon Floss threads really make this piece sparkle - I wish you could see the actual model! Then I set the project down and didn't touch it for a year. Ahem. Time flies, etc., etc....

When I pulled it out again last month I realized I just had to figure out how to put the violets in the center. My first idea was to stitch a little tussie mussie of violets in the center or perhaps a whole violet plant. But when I graphed out a violet flower, I realized it would be fairly easy to make the violets geometrical/symetrical to echo the four-way bargello....I then added a few violets in the corner and "VOILA! C'est fini!"

Here's a close-up of the violet center:


You can see that I added a few gold beads in the centers of the flowers, just to add some dimension to the piece.

Originally, I intended to make this into a pillow and not enclose it with a border. But when I finished stitching the bargello and violets part it looked sort of plain just floating there on the canvas. So of course, I started adding one border, then another, and another.....until it was totally encircled to my satisfaction. Now it's a frame-able piece.

So if you're a sweet violet fan (like me) and you like all things purple and green (just like me) and you're in the mood to stitch a springtime project (oh YEAH!) - this might just be the project for you! Please visit my website to see the ordering information for my new BARGELLO AND VIOLETS.

And.....Have a Happy Easter weekend!