Thursday, March 31, 2016

Old-Fashioned Quilts

I was doing some printing this week of older quilt designs and came across some favorites that evoke old-fashioned quilts that are softened and faded with time.  I pulled out a few of the models so I could look at them and reminisce about stitching them many years ago.  sigh... I still love these traditional quilt designs....

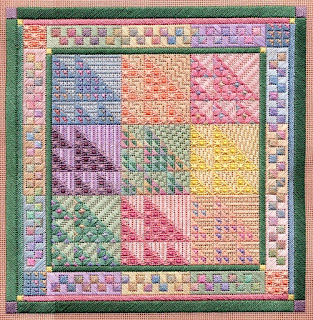
SAWTOOTH SAMPLER, originally stitched in soft pastels, but great for working from your stash:


I also stitched it in slightly BRIGHTER colors, and list those threads on the pattern as well:


Then there's FLOWER BASKET, a soothing geometric quilt, which I love for its scalloped borders:


And this is FLOWER GARDEN, which has a slightly stained glass look to it, I think, and looks good in lots of different spring color combinations... The first model I stitched in greens and pinks:


...then I stitched it again in cool greens and apricots (another yummy combination!):


Then there's GRANDMOTHER'S GARDEN, which has such a lovely old-fashioned feel to it
(and LOTS of little squares to stitch!!):


So if you're in a soft pastel, old-fashioned quilt kind of mood, please check out these quilts, along with many others, in my American Quilt Collection, over on my website....

Friday, March 25, 2016

Bunnies & Eggs For Your Easter Basket

Are you looking forward to celebrating Easter this weekend?
Do you have plenty of springtime projects to help you enjoy the season?

Here are some of my favorite Easter pieces that feature eggs and bunnies:

 SPRINGTIME QUILT


BARGELLO EGG


 EASTER EGG ORNAMENTS


my most recent SPRING SURPRISES


 DAISY O'HARE


 SPRINGTIME WREATH


 and last, but not least, HAPPY EASTER, HAPPY SPRING!


Enjoy your weekend, Stitchers!

Wednesday, March 23, 2016

Re-Teaching a Favorite Class Project!

Stitchers, have you heard about "messy beading"?  
      Have you been curious about it, but didn't know where to use it?
                  Well I've got a great little project for you to try your own messing beading on.....

Basically, instead of attaching beads one at a time, you scoop up several beads and then attach them in loops or strings or however you want...creating a very fun 3-D textural look to your canvas.  I decided to create a small printed canvas with a simple flower that had the right type of center that could take some "messy beading" on it.  Here's the initial drawing I created on my ipad, from a purple daisy photo:


Then after I printed in on 18 ct. canvas, I stitched it up with some zippy checkered (and padded) borders, some easy petal stitches, a fast "shadow stitched" background, and of course, the messy beading.  Here's how it turned out:


It was soooo fun to stitch up!  I've used DMC flosses in the 333 periwinkle blue family, so the colors are that lovely purpley blue; and I craved a lime green background just for the fun of it,which also makes the purple flower POP.  And I thoroughly enjoyed using the messy beading technique -- it was much easier than I expected - and certainly adds a lot of BLING to the piece!

When I got done I thought, "You know, this would make the perfect cyber class -- not too big, not too hard, and not too long - for stitchers like me who want to try some messy beading, but don't want a really big project."

And since I've had several requests to offer this fast and fun class again.... TA DA:
Here it is again, folks, my next Cyber Class called "Purple Daisy: A Messy Beading Project".  Registration starts today, March 23rd and runs thru April 30th.  The cyber class will start the beginning of end of May 2016, and have four emailed lessons.  Check out the details on my website!

Friday, March 11, 2016

Fresh Eggs!


Is there anything more satisfying that stitching on a springy project in the depths of winter?
Not much.... except maybe FINISHING a new project, so you can start another -- am I right, Stitchers?!?


Anyway, I've been happily stitching on a fun new quilt design that is a springtime companion to the HOLIDAY GIFTS quilt design I did around Christmas time.
  
 I've finally finished it, and it's called SPRING SURPRISES:


Oh, Yum!!  This was just plain fun to stitch, especially working with perky Watercolours 145 - "Carnival" - which I don't think I've ever used before. And then there are the four happy eggs.... they were lots of fun to design and stitch, using the simplest stitch patterns I could think of (there's not a lot of room on these eggs to use complicated stitches!)   Here's one of them up-close and personal:


Happy, happy stitching, I gotta tell you....
So if you're in need of a springy new project to boost your spirits in the midst of this rainy snowy season, please grab your flower basket and hop on over to my website to gather up some fresh eggs to create your own SPRING SURPRISES!

Thursday, March 3, 2016

Inching Along...

This past weekend I decided to pull out a small Sandra Gilmore painted canvas that I had been working on last year, but got stalled with it and put it aside to work on other counted pieces.  It's called NANTUCKET, and it looks like this:


I'm in love with all of Sandra's garden canvases, and this one appealed to me because of the bold turquoise gate, as well as all the flowers.  And it is small, approx. 8" by 10", so how hard could it be to finish, right?  Ha, ha.... Joke's on me, because there are dozens of colors in the flowers and greenery, so it turns out to be more involved than I expected.

In a canvas like this, I like to start with the background areas... which means stitching the wall, the shadows, the foliage, and the sky. ( By the way, since this design was painted on "vintage" canvas that is blue with parchmenty blue sections showing thru, I decided to add a few clouds floating by,  picking out the lighter blue areas on my canvas and turning them into clouds.)

Then on to the focal points, which are the garden gate and all the flowers.   The gate was easy enough (diagonal satin stitch done in silk Splendors), but the flowers required a bit more thought.  What stitches to put where?  And what type of thread?  I started making the flowers with variegated DMC floss, which has lovely variegated pinks and yellows.  But the softness and fineness of the cotton floss just didn't stand out on top of the foliage (which had the upper leaves stitched with variegated ThreadworX floss).  So I decided to try the shiny rayon Ribbon Floss to see if they would add more shine to my flowers.  I started on the left side of the canvas and made all the tall yellow flowers with long bullion stitches.  With lots of overlapping bullions, here's what they look like up close:


And yippee!  The Ribbon Floss did give the flowers a discreet shine, so I decided to stitch with Ribbon Floss for all the rest of the flowers.

This past weekend I wanted to push on and get more of the flowers stitched, so I moved over to the lower left side of the canvas to work on those flowers.  I used 1 strand of Ribbon Floss for the smaller pink lupines (?) as indicated by the pink arrow.   Then when I started stitching the tall blue delphiniums, I realized that 1 strand of Ribbon Floss was too small, so I tried doubling my thread in the needle, and made lots of sloppy, loose french knots with 2 strands of Ribbon Floss (where the blue arrow is pointing) - and voila! - the flowers had the bigger, looser look I wanted!

Then I had to figure out what to do with the purple hydrangea heads.  I didn't want to make any more french knots (had enough of those!).... so I decided to try massing irregular cross stitches - some 2x2, some 1x2, and just mix them up.  I also stitched them in more shiny Ribbon Floss, and to "floof" them up a bit I stitched each cross stitch twice, one on top of the other, as the purple arrow shows.  I even sprinkled a few french knots around the hydrangeas (you can see them in the upper, smaller masses, but I haven't added them to the larger, lower mass).  

Whew! By the end of Sunday, I was tired of making french knots and needed to put this project aside.  Now, the only thing I have left to figure out is how/what to do with the climbing roses.  Bullions? Satin Stitches?  Can't decide... but I'm sure I'll figure something out, so I can get this piece finished, the stitch guide done, and finally move on to something new!