Monday, May 28, 2012

A New Summery Piece!

Are you having a wonderful Memorial Day weekend?  I hope you all are...

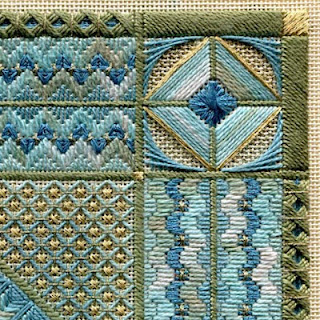
And to celebrate the unofficial beginning of summer, I've just finished a new design that is really, really summery -- and I call it "EBB TIDE" because it has such a beachy feel to it.  Here's what it looks like:


 I absolutely adore the Watercolours thread I built this design around (241 - "Shenandoah).  I've been eager to use this color thread for a project and this one is a perfect fit!   Because "Shenandoah" has a delicious watery turquoise paired with bits of white (think cloud whisps or the foam of ocean waves), and a smidgeon of sage green (waving dune grasses).  I then added some soft gold metallics that move throughout the piece like shimmering beach sand.

I picked out a handful of very fun stitches to use in this piece.... And because it's a geometric piece with symmetrical borders and sections, you know in advance that whatever you stitch once, you'll have to repeat three more times, in the other sections.  But I thought, "Hey, wait a minute... let's make it a bit more fun... why not create two slightly different border patterns, so they LOOK alike, but are actually stitched differently?"  So that's what I did... and I thoroughly enjoyed stitching the zig zag borders (in the north & south rows) and the wavy borders (in the east & west rows).  Here's a peek at the two different sides to give you some idea of how it looks:


And check out the fun corner blocks!  A simple Rhodes Diamond is surrounded by long diagonal stitches, then framed by some simple Jessica curves, with the remaining background sections worked in an alternating tent stitch with the fine Kreinik #8 gold metallic.  I love how those curves soften the hard edges of the corner boxes, and echo the gold circles in the rest of the design.

Also, a basic four-way stitch is used in the center block area (you can see it in the lower left of the photo above) and is embellished with two types of gold metallic thread. AND instead of stitching the same pattern in all four sections, I've decided to create TWO slightly different versions that you alternate, to make it a wee bit more fun to stitch.

As for the gold metallic circles that are the focal point of the piece, when I stitched them and left the centers uncovered, they looked a bit like sand dollars or round sea urchins.  But having found a terrific source of dazzling Swarovski crystals, I was itching to use them and decided to finish off the design with a few well-placed crystals -- and they are included with the pattern!

So if you want to kick off your summer fun with a new stitching project, please visit my website for more information on ordering the new EBB TIDE.... and enjoy the rest of your long weekend!

Monday, May 21, 2012

Mini Mystery Monday #8, pt. 4

We've reached the end of another mystery piece....

There's just a bit of embellishment to add, and then you're done!

Here's the full graph of Version A, with the triangular "flying geese" border and all you need to add are the metallic Rhodes Diamonds that fit within the empty diamond boxes around the border:  


You'll notice that I've put in the background stitches in two of the four quadrants, just to show you how to stitch the background if you want.  The nice thing about using a colored canvas is being able to omit those last background stitches and save yourself some stitching time!

I've also suggested some places to add beads, but you can put them anywhere else you can think of yourself....  Here's the quarter-sized graph (with the background stitches) for you to study up-close:


And here's the full size graph of Version B, with the wild metallic fanned border:


Not much left to do here but add some beads... Although I've added the optional background stitches in the center block area to show you what it might look like.  Again, leaving the background canvas exposed is perfectly fine for this piece and shows off the stitch texture much better, I think.

I've chosen some possible bead locations, but feel free to find your own as well!  And here's a quarter graph for you to study up-close:


Here's what my finished piece looks like (without any beads or background stitches):


Since I was in a very springy mood when I started this piece, I used a handful of pastel threads on pale pink canvas, which doesn't show very well in the photo (pastels never have the dramatic impact that bold or jewel colors do, alas).   And now  I'm thinking that this design would look particularly good in autumnal colors, to show off the Southwestern look of the different stitches.

So I hope you've enjoyed working up this design and will fiddle around with the different borders and try a few versions for yourself in different colors.  And I'll see you again when I have another Mini Mystery worked out for you!

Tuesday, May 15, 2012

A Reminder

Just a reminder:  today's the last day of registration for my new Cyber Class: "FLEUR-DE-LIS".


It's a sweet little botanical piece  8" x 8" on 18 ct. canvas) that has an electric blue (or purple if you prefer) iris in the center, surrounded by a handful of fun patterns.  The class will run for four weeks - with email lessons sent each Saturday.  You can stitch along with the lessons, or just print them out and go at your own pace.... or just tuck it away in your stash for a future project!

There's no pressure in this class - just lots of stitchy fun!  So visit my website and sign up if you're interested.

Monday, May 14, 2012

Mini Mystery Monday #8, pt. 3

Have you completed your center block yet?  (Or at least got it well established...)

If so, you're ready for the next part of this mystery: the surrounding border.  And surprise, surprise, you get to make a decision about what type of border you prefer around your block!  The border area is only 8 canvas threads wide, but within that limited area there are still lots of things you can do to change your design...

The first version that I came up with has a more traditional quilt-y border, using those happy "flying geese" triangles that I'm so fond of stitching. And notice how this version has little bits of metallic sparkle added in the flying geese triangles, as well as metallic boxes in the corners -- just one way to make a simple design as interesting as possible.... Here's what VERSION A looks like:


And here's a quarter section graph, so you can see the stitches a little better:


Then I thought it would be fun to create a jazzier border that includes more of the metallic "fans" that are in the corners of the center block.  Because I think of these small designs as perfect for stitched ornaments, I try to sneak in as much glitz and sparkle as possible.... Also, I've used the thinner #8 Braid for the fans in this graph -- with the metallic ribbon used inside the border triangle areas, but you can reverse the thread types if you want, using your metallic ribbon for the fans and the thinner metallic inside the triangles. Either way will provide plenty of sparkle!
So here's what VERSION B looks like:


And here's the up-close look at just one quarter of the design:


Pretty snazzy, huh?
I hope these two versions give you plenty of ideas and even some inspiration to try both designs in different types of threads.

Have fun working with these different elements and I'll see you next Monday, where we'll complete this pattern with just a few more finishing touches.  Happy Stitching!


Friday, May 11, 2012

Friday Flowers: Singin' the Blues

Well, I showed you the very blue BASKET OF BLUEBONNETS yesterday, didn't I?

And for some reason I've had a flurry of orders for my BLUEBONNET COLLAGE this month  (actually it's not so surprising, considering that The Needleworks in Austin, Texas is teaching a class of my BLUEBONNET COLLAGE this summer, so if you're interested give them a visit!)

Anyway,  I thought I'd share some blue flowers with you today.  I mostly have pinks and reds and oranges in my garden, but there are a few blue things peeking up in the corners, so I hope you enjoy these springy blue blooms.... and notice how striking those yellow centers look against the cool blue petals -- Mother Nature certainly knows how to pair colors, doesn't She?


HAPPY FRIDAY!    


Wednesday, May 9, 2012

...It's Another Basket!

Keeping to the basket theme from last week, I want to share this other design with you.  It's called "BASKET OF BLUEBONNETS":


Several years ago, I had an invitation from Nancy Wahler at The Counted Thread in El Paso, Texas to visit and teach a class at one of their stitching events.  To celebrate this special occasion, I created this quilt design, using all Texas-themed blocks.  Here's a peek at the basket block (on the right) and the bluebonnet block next to it on the left:


And when I went searching through my quilt books, I came across three other blocks called "Texas Tears", "Texas Treasure" and "Texas Puzzle" that I graphed out and offered as possible options for the center block of the quilt design.  It was a fun way to let each stitcher personalize their project, and have a bit of a surprise when they finished.

So I flew to El Paso, met a great bunch of stitchers, and had a fantastic time teaching the class.... not to mention eating lots of terrific southwestern cuisine and generally having a blast with all those fun stitchers in Western Texas. 

I've recently re-introduced this pattern to my AMERICAN QUILT COLLECTION on my website, so if you want to create your own BASKET OF BLUEBONNETS, please check it out...... and hey, y'all!  ...they may call these flowers bluebonnets in Texas, but here on the West Coast we call them LUPINES, and they can be found growing in other colors besides blue -- yellows and pinks, for example.  So if you want to create a different color version of this design, you can certainly have fun doing that, too!

Monday, May 7, 2012

Mini Mystery Monday, #8, part 2

Now that you have your center block established, we can work on adding a bit of glitz and glamor to that very same area, as well as adding the dark outer border.  Here's the overall graph for you to see:


 And here's a close-up graph of just one quadrant, that you can use to stitch all the other quadrants as well:


You can start by adding the thinner metallic stitches (I used a gold Kreinik #8 Braid) - first by making a Rhodes Star in the very center of the design; then stitch the gold triangles that are a bit further out.

In the corners of the center block, make the large Fan Stitch element with 1 strand of your thin metallic thread.  I suggest using your needle to slightly enlarge the hole in the corner where all your stitches are converging, just to make those stitches lay snugly side by side.  Also, as in any eyelet-type stitch, it's best to come UP on the outside edge and go DOWN into the middle/hole. The stitches go in every other hole except for the center stitch which fits right down the middle. 

Finally, you can count out to the dark outer border and get that established over 4 canvas threads, using your darkest pearl cotton color.  Add the metallic corners and center triangles, and VOILA -- you're done for this week!

Friday, May 4, 2012

Friday Flowers Is Back!

If you haven't guessed by now, I have a serious fascination for flowers with raindrops on them.  Okay... let's be honest, it's an obsession (and you would certainly agree if you saw ALL the raindrop photos I've taken this past year.)  I love looking at the delicate raindrop patterns, but there's also the realization of how fleeting and fragile these drops are -- truly a momentary beauty that can only be preserved in a photo..

But the last rainstorm we had a week or so ago was a BEAUT, as far as giving me some fantastic photos of raindrops on roses, tulips, primroses, poppies, pansies.....well, you get the picture!

So prepare yourself for lottsa lovely drops.... (And I hope you enjoy looking at them as much as I do,
especially if you click on the individual photos and study them up-close. Personally, I'm blown away by how sharp these shots are considering I'm using a small digital camera, a Canon PowerShot A1000 that I often carry in my pocket when I go for walks with my dog Katie)...


All these photos remind me of the "Doctor Doolittle" song Anthony Newley once sang:
"My friend the Doctor says that every time it starts to rain,
And people run indoors again, in swarms;
If you remain 
Out in the rain, 
You'll think you're drinkin' pink champagne...
And you'll spend your life prayin' for thunderstorms!"

I heartily agree -- with camera in hand, of course -- grin.....

May these pictures remind you to rejoice in the extraordinary beauty that surrounds us each and every day.  HAVE A FABULOUS FRIDAY!