Friday, June 5, 2015
Curves (and Curliques) Ahead
Last year I had fun exploring the wonderful world of painted canvases and creating stitch guides for some of them. But this year, I resolved to get back to work on new counted canvaswork designs, and try harder to balance my time and energy between painted canvases and counted geometric designs.
I pulled out a piece I've had on stretcher bars for quite a while, and determined to FINALLY GET IT FINISHED! As it sometimes happens when I'm working on a totally new and complex piece, I will stitch myself into a corner and not know how to proceed. With the pink project shown above, I had stitched all the fancy corners and centers (and lots of Jessicas), but was left with a wide background border area that I didn't know quite how to finish. So the piece sat for a long time, and I moved on to other projects. Then Kreinik came out with a new thread - a #16 Braid that had WIRE in it, so it can be bent into fun shapes and spirals for a lovely dimensional effect. AHA! Just the thing to make some simple curlicues and couch onto my pink background. So I went back to stitching on this piece (which I decided to name ARABESQUE) and once the curliques were in place, I was able to stitch on to the end and finish the piece.
Oh, and there was one other dilemma: what kind of unusual jewels could I use to add bling to this design? I decided to try some gold oblong beads - just for something different... And it was also a challenge to find a crystal jewel large enough to stand out in the center, but I finally found one. (Both the beads and the large jewel are included in the pattern).
And, TA DA!!! Once I found my beads and jewels, I was all set. Time to get the pattern finished so I could release this brand new design and share it with you. And here it finally is: ARABESQUE.
I stitched the model in my favorite "Pink & Green" combination with gold accents, although the pinks are very muted and more like the mauve "ashes of roses" color so popular at the end of the last century. But this is such an elegant piece, it would definitely be fun to stitch in lots of other colors, don't you think? (I wish I could stitch this up in other colors, but I've got other projects to finish, more threads to try, new pieces to design, still more cyber classes to create!!).... But I've gone ahead and included other thread suggestions in the pattern for a handful of other colorways such as BLUE, PURPLE, PEACH, and TURQUOISE.
As in most of my designs, the color palette starts with a variegated Watercolours thread (the pink version uses 022 - "smoke") and a handful of DMC #5 pearl cotton colors. Mix in two Ribbon Floss threads (one mauve, one gold), and accent with a few Kreinik metallics..... The finished piece is apprx. 12" x 12", and is stitched on a 16" x 16" piece of 18 ct. mono canvas. I used my favorite Santa Fe Sage Green canvas, but you can do it on any color canvas you prefer. If you'd like to try your hand at a totally new type of geometric design, please visit my website and see the ordering information for my curvacious ARABESQUE.
Thursday, May 14, 2015
Need a Guardian Wolf??
Well, here's one that's watching over me in my office now, and he's called THE SENTINEL, by Sandra Gilmore. I was asked by the owner of FLEUR DE PARIS, the distributor of Sandra Gilmore painted canvases, if I'd be interested in creating a stitch guide for this canvas. And of course I said, "YES, YOU BETCHA!"
Here's what the whole finished piece looks like:
The most daunting task with this piece was choosing the threads. I mean, look at all those greys -- Ai Yi Yi!!! It was tough deciding whether to go with cool greys or warm greys... and then making them match the soft merino wool Bella Lusso threads I used for the wolf's coat. I can't tell you how long it took me a while to narrow down my options, but once I did, I was able to start stitching. And in this case, I worked from the bottom up to the top: starting with the snowy ground (all done in sparkly Ribbon Floss ribbons); then working the birch trees (tent stitching the outlines and colored bits, then long stitching the remaining areas), which were tedious but not hard at all; and then tent stitching the background sky with diagonal stitched branches.
As you can imagine, I was a bit anxious to tackle all that fur, but again, I started at the bottom by the snow, and worked my way upwards, following the colors on the painted canvas and angling my longish diagonal stitches to follow the lines of the wolf's body. Here's an up-close look:
Actually, it was easier to do than I expected, and once I got going, working each color at a time, from darkest to lightest, I really enjoyed it. I left the face for last....and then carefully stitched each of the facial features. Also, before I started stitching I googled "wolf" to get some reference photos to work from, which helped a great deal.
All in all, I really enjoyed the challenge of figuring out this beautiful canvas and bringing THE SENTINEL to life (the finished size is 12" x 12" on an 18 ct. painted canvas). If you are a wolf lover, or just need your own guardian wolf, please check out my new stitch guide for THE SENTINEL by Sandra Gilmore on my website, or order it and the canvas from your favorite stitchery store!
P.S.: If any of you are going to the TNNA trade show in Columbus this week, you can see my model at the FLEUR DE PARIS booth. So please stop by and say hello to my furry SENTINEL!!
Friday, April 10, 2015
Friday Flowers: Azaleas
Azaleas! It's all about the azaleas this weekend of The Masters in Augusta!
I've been busy running errands, plus printing and mailing lots of my new
SPRINGTIME WREATH pattern this week.... all in hopes of clearing my desk
But seeing those luscious pink flowers reminded me to pull out my AZALEA COLLAGE
and hang it in my hallway, to enjoy my stitched version of these elegant flowers.
Well, YUM,,, Love, love, love these springy pinks and greens!
What better way to enjoy these bright blooms than to stitch them so they never fade;
that's my way of thinking, anyway.
But for one of this weekend's projects, I'm gonna finish up my small "R is for Rabbit" piece,
from Prairie Schooler's Alphabet (oooh, and it's got more pink & green, imagine that):
I'm stitching this 4" x 6" cross-stitch design on eggshell 18 ct. mono canvas, using
4 ply of DMC floss in plain ol' Tent Stitch. Easy peasy, really, and something
I find very tranquil to do in-between other large, complex projects.
I'm almost done.... so I'll certainly be hopping over to another project in my stack.
HAPPY FRIDAY, STITCHERS and
hope you have a restful and stitchful weekend, too!
Monday, April 6, 2015
Egg-cell-ent New Wreath!
Oh, all you Springtime Lovers.... have I got a new pattern for you!
It's my new SPRINGTIME WREATH, that is filled with all the happiest things of Spring --
pastel flowers, decorated eggs, and a soft chick and bunny.
There's so much going on with this wreath, that it's hard to take it all in, isn't it?
When I started stitching it up, I began counting out from the center point,
working the velvet ribbons and bow first; then adding all the eggs, doing them one by one.
The bunny and chick came next (done in touchable-softBella Lusso merino wool);
then I wove the small basket and filled it with plump eggs.
Adding lots of pastel flowers came next -
daffodils, pansies, open tulips, and tiny pink blossoms were fitted between all the larger items
on the wreath. I selected a variegated ThreadworX #5 pearl thread for the wreath foliage,
that is worked in an easy Pavilion Diamond variation to fill the background
behind all the wreath items.
After everything was stitched, I finished my wreath by adding a handful of beads (included with the pattern). I also went back and outlined each egg with a simple Stem Stitch, using the softly variegated ThreadworX, to make each egg stand out a bit from the wreath greenery.
Like any stitchery project,
if you break down this SPRINGTIME WREATH into manageable steps, and
focus on each step at a time, it really isn't so difficult.... and as the piece begins to take shape
right before your eyes, you can celebrate the process (as well as the joys of spring) --
and take pride in creating something that you'll enjoy displaying every year!
So if you're up for a new wreath to display in your house, please hop on over
to my website and see the thread list and other information for ordering
this new SPRINGTIME WREATH.
Friday, March 27, 2015
Egging You On...
Are you getting into that springtime Eastery mood yet?
I think springy stitching projects are the best mood-lifters after a long grey winter,
and I'm always in the mood to work on something with soft spring colors,
like this LONG SPRING PANEL:
But around Easter it's really fun to stitch up some eggs, like these 4.5" x 5.25"
EASTER EGG ORNAMENTS:
And if you REALLY like Easter eggs, how about this large BARGELLO EGG:
Go visit my website and take your pick....
then get to work stitching some Eastery surprises for your friends and family!
Happy Friday!
I think springy stitching projects are the best mood-lifters after a long grey winter,
and I'm always in the mood to work on something with soft spring colors,
like this LONG SPRING PANEL:
But around Easter it's really fun to stitch up some eggs, like these 4.5" x 5.25"
EASTER EGG ORNAMENTS:
And if you REALLY like Easter eggs, how about this large BARGELLO EGG:
Go visit my website and take your pick....
then get to work stitching some Eastery surprises for your friends and family!
Happy Friday!
Thursday, March 19, 2015
Spring is Busting Out All Over
Are you seeing signs of Spring in your neck of the woods?
Here in northern California everything is bursting with tender green leaves
And gardens are filled with lots of bright colors...
It's the right time of year to start a springy new project, that's for sure!
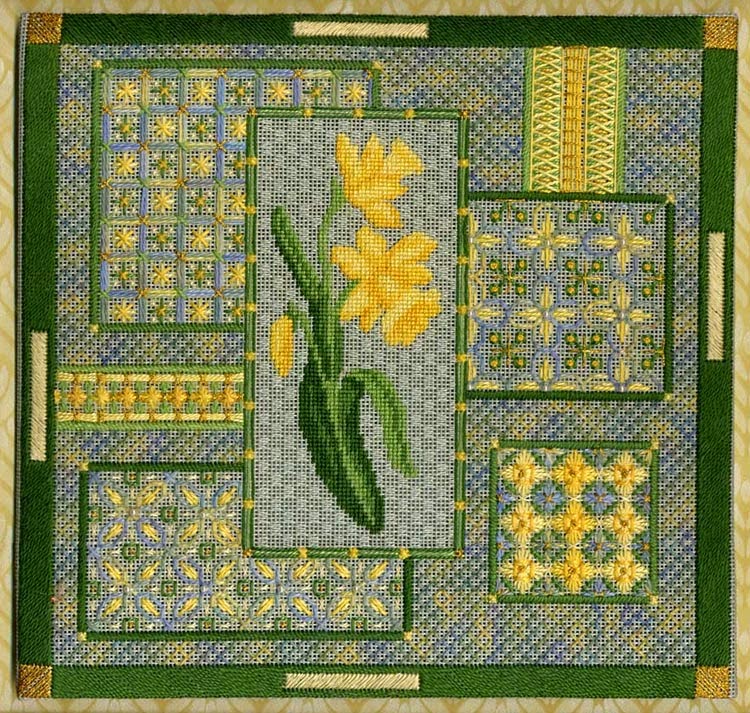
If your daffodils aren't blooming just yet, you can always stitch up a bouquet,
with my classic DAFFODIL COLLAGE pattern:
Or are you a tulip person?
Here's my softly pastel PINK TULIP COLLAGE:
If you crave something a little brighter, how about the SPRINGTIME RIBBONS piece,
which features lots of fun flowers, bunnies, chicks and eggs:
Or brighter still, here's a vibrant HAPPY EASTER/HAPPY SPRING! project that's perfect for hanging in your entryway or making into a happy pillow (you can find the pattern under my American Quilt Collection):
Can you guess that Spring is my favorite season?? Anyway, over the years I have created many wonderful springtime projects that are sure to lift your spirits and get you into a happy stitching mood. If you're craving a dose of sunshine, please visit my website to see these and other springtime designs!
Tuesday, March 17, 2015
An Elegant Egg
I've always been fascinated by Faberge eggs, with their incredible craftsmanship, elaborate detail and luscious colors. And I've always wanted to try creating them with stitches (since the chances of ever owning a REAL one are totally non-existent!)
So here's one I've stitched for this season, called IMPERIAL EGG I:
I wanted to try replicating the enamel patterns used by Faberge on his eggs, but instead of using precious jewels, I would use my needle and thread with easy stitch patterns (this egg has a simple bargello pattern), and subtle variegated silk threads (for the egg and ecru ribbon border). Add a elegantly pale background pattern and some discrete vintage gold sparkle, and you have a very fun project to stitch up for the Spring season.
I've worked this egg on 24 ct Congress Cloth, and the finished size of the whole design is 6.5" wide by 8" tall.... Not too small - not too large -- just right! I chose to create a mauvey-pink egg (with Waterlilies 249 - "Geranium"), but it can certainly be worked in any favorite color. To change the colors, you just need to pick out 2 skeins of a Waterlilies silk thread, a matching solid-color silk, and a matching metallic ribbon thread.
If you want to try creating your own Faberge egg, please visit my website to see more of information on this new IMPERIAL EGG I.
So here's one I've stitched for this season, called IMPERIAL EGG I:
I wanted to try replicating the enamel patterns used by Faberge on his eggs, but instead of using precious jewels, I would use my needle and thread with easy stitch patterns (this egg has a simple bargello pattern), and subtle variegated silk threads (for the egg and ecru ribbon border). Add a elegantly pale background pattern and some discrete vintage gold sparkle, and you have a very fun project to stitch up for the Spring season.
I've worked this egg on 24 ct Congress Cloth, and the finished size of the whole design is 6.5" wide by 8" tall.... Not too small - not too large -- just right! I chose to create a mauvey-pink egg (with Waterlilies 249 - "Geranium"), but it can certainly be worked in any favorite color. To change the colors, you just need to pick out 2 skeins of a Waterlilies silk thread, a matching solid-color silk, and a matching metallic ribbon thread.
If you want to try creating your own Faberge egg, please visit my website to see more of information on this new IMPERIAL EGG I.
Subscribe to:
Posts (Atom)